
National park scenic drives are a great way to get familiar with a new park. These drives often take you to views of the most iconic sights in the park, guaranteeing you see the famous landmarks at each site. They’re usually a wonderful opportunity for pictures. They also often have trailheads and picnic spots where you can stop.
If you do a national park scenic drive early in your trip, you can note trails or activities you might want to come back and explore further as well.
The national park drives on this list include a variety of terrain and scenery, from mountains to deserts to coastlines and more. In this article, we’ll share tips for driving and RVing these routes so you’ll have the information you need before you go.
Trail Ridge Road – Rocky Mountain National Park, Colorado
Driving Trail Ridge Road is one of the most popular things to do at Rocky Mountain National Park. The road connects the east and west sides of the park, so you can enter near Grand Lake and exit the park at Estes Park. But it’s an interesting – as well as a practical – drive.
Trail Ridge Road is the highest continuous paved road in the United States, topping out at an elevation of 12,183 feet above sea level. The road crosses the Continental Divide, and eleven miles of the drive are above the treeline. You’ll see alpine tundra, wildlife, and flower-strewn meadows along with breathtaking views of the mountains stretching out on all sides.
Planning Your Drive
Plan to make lots of stops as you drive Trail Ridge Road. There are pullouts and overlooks all along the drive, along with great places to take photos. Also, plan to stop at the Alpine Visitor Center at the summit of the road. You’ll find displays on the history, wildlife, and ecosystems at this extreme elevation. There is also a gift shop, a restaurant, and observation areas. The Apine Ridge Trail begins at the visitor center, and is a short but steep walk that brings you to amazing views of the Never Summer Mountains…on clear days, you can see to Wyoming. The altitude and steepness of the hill is no joke, however, and some people refer to the trail as “Huffer’s Hill.” You might spot pikas and marmots along the trail.
Road Restrictions
Trail Ridge Road closes during late fall, winter, and early spring because of snow. It typically opens around Memorial Day weekend and closes in mid-October. Dates vary each year, however, and are dependent on the weather. You can check the national park page to see if the road is open when you plan to visit.
Vehicle Limits
The Rocky Mountain National Park page does not list any vehicle restrictions for driving Trail Ridge Road. However, it is a winding, two-lane road, with some switchbacks and a maximum grade of 7%. There are some pullouts that can accommodate larger motorhomes or trailers, but not all of them.
Tolls/Fees
There is no fee specifically for driving Trail Ridge Road. However, there is a $30 fee for a one-day pass and a $35 fee for a 7-day pass to enter the national park. Also, from the end of May until mid-October, guests must have a timed entry reservation to enter the park during peak hours. There is a $2 processing fee to make these reservations.
Driving Tips:
Driving Trail Ridge Road is exciting, but it can also be challenging if you’re not prepared. Here are some tips for driving the road:
- Watch for altitude sickness: Altitude can affect people, especially at 12,000+ feet above sea level. Signs of altitude sickness can include headache, nausea, dizziness, or fatigue. Stay well-hydrated during your trip, and rest if needed. If you’re not used to altitude, it can also be helpful to take it in stages. Stay at a Denver campground for a few days, then camp at Rocky Mountain National Park to acclimate before attempting the drive.
- Weather changes rapidly: In the mountains, you can be enjoying a warm, sunny day one minute, and a chilly wind a few minutes later. You’ll want to bring plenty of layers, and you’ll likely be adding and removing them throughout the day. Also, be aware of thunderstorms. They usually form on summer afternoons, but there is a chance of them throughout the day. Seek shelter in your car or the visitor center, and do not hike or be outdoors during thunder and lightning. Be ready to use pullouts if it gets extremely rainy and affects visibility.
- Stay on trails: The ecosystem along Trail Ridge Road is delicate, and fragile tundra vegetation can take hundreds of years to recover if it’s stepped on or crushed. Stay on the marked trails to keep the environment as pristine as possible.
- Watch for wildlife: Sometimes it’s easier to watch for lots of cars pulled off the road, or a group of people all looking in one direction, than it is to try and spot wildlife yourself. If you see a group all looking at something – chances are it’s an animal (usually elk). You may also be able to see elk from observation areas at the visitor center.
- Check road conditions: Even though the road typically opens in May and closes in October, it can close in summer if there’s a snowstorm (it happens!). Check to make sure the road is open when you hope to use it.
- Fuel up: There aren’t any gas stations inside Rocky Mountain National Park. Make sure you have plenty of gas – there are gas stations in Grand Lake to the west and Estes Park on the east side of the park.
Going-to-the-Sun Road – Glacier National Park, Montana
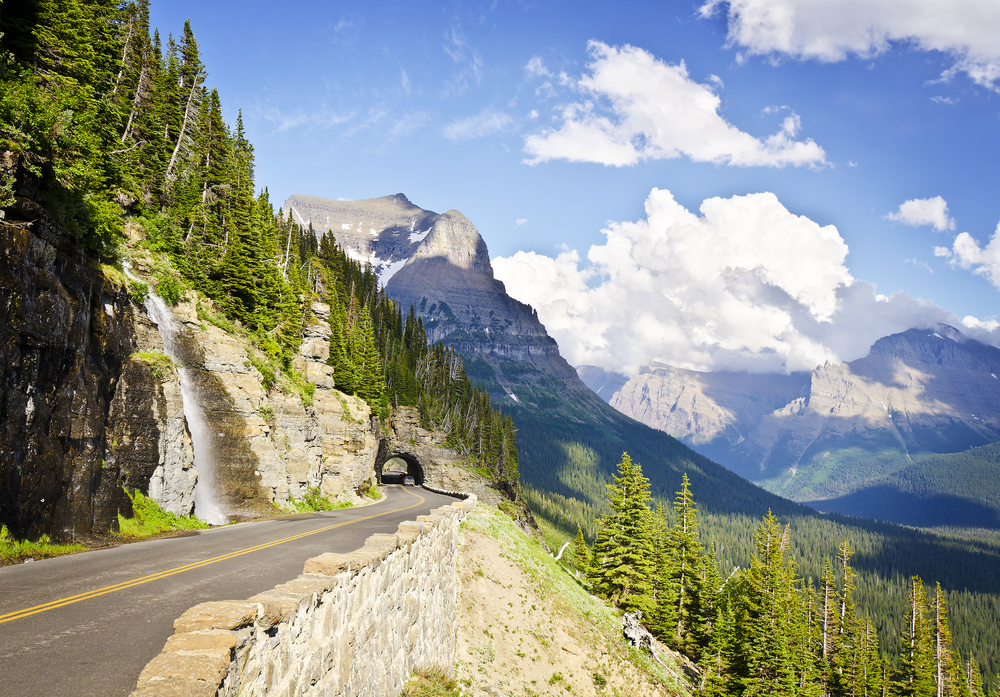
Going-to-the-Sun Road in Glacier National Park is 50 miles long and goes from east to west through the park. It climbs up to Logan Pass, which, at 6,646 feet at its summit, is the highest point reachable by vehicle in the park. This is also the trailhead for some popular hikes like Hidden Lake Overlook and Highline Trail. The road is carved into the mountains and is a National Historic Civil Engineering Landmark. It features hairpin turns and stone guardrails. One section of the cliff along the drive has a “weeping wall” – an area where snowmelt seeps out of the rock face and makes a curtain of water falling onto the road.
You can see beautiful scenery, including cliffs, waterfalls, valleys, alpine meadows, and sweeping mountain vistas. You might also spot wildlife, including mountain goats, bighorn sheep, grizzly bears, and marmots.
Planning Your Drive
Going-to-the-Sun Road has plenty of pull-outs and areas where you can park to admire the view. Some of the most popular pull-offs include the Lake McDonald Lodge Area, Heaven’s Peak Overlook, the Weeping Wall, and Logan Pass.
Road Restrictions
The lower elevations of Going-to-the-Sun Road are open year-round, but the higher elevation portion of the road closes during late fall, winter, and much of spring because of snow. Typically, the road is fully open by early July and often closes the third Monday of October. However, exact dates vary depending on the weather.
Vehicle Limits
Vehicles and vehicle combinations like trailers can’t be longer than 21 feet, including bumpers, or wider than 8 feet, including mirrors, from Avalanche Creek to Rising Sun. Vehicles that are more than 10 feet high can have trouble driving west from Logan Pass to the Loop because of rock overhangs. If your vehicle is close to these measurements, you may want to consider an alternate route.
Tolls/Fees
You’ll need to pay the park entrance fee of $35 per vehicle during warmer months, or $25 per vehicle in winter. During peak season, you’ll also need to get a timed-entry reservation and pay an extra $2 to drive the road.
Driving Tips:
Here are some tips for driving Going-to-the-Sun Road.
- Take your time: Plan to make lots of stops to see the view or watch for wildlife. The road is 50 miles long, but will likely take you about two hours to drive without stopping. However, you’ll want to allow a lot more time for stops, hikes, and other sightseeing along the way.
- Fuel up: There are no gas stations inside Glacier National Park. Make sure you have plenty of gas before making the drive.
- Try a tour: If your vehicle is prohibited from the drive, or you don’t want to do the drive yourself, there are a few tours that drive the road. Red Jammer buses, shuttle buses, and Blackfeet tour buses all offer rides that go along the road, as well as to other places in the park.
- Be ready for construction: Summer’s good weather makes it an ideal time to work on the road as well as drive it. Check the Road Construction page to learn what projects may be going on while you’re visiting.
- Take the audio tour: There is a series of podcasts about the road, and you can listen as you drive to learn more. You’ll want to download the podcasts prior to arriving at Glacier National Park, however, since cell service in the park can be sketchy in areas.
- Start early: The Logan Pass parking lot fills up quickly – often before 8 am on busy summer mornings. Get an early start if you want a parking spot here.
Chain of Craters Road – Hawai‘i Volcanoes National Park, Hawaii
Chain of Craters Road at Hawai‘i Volcanoes National Park begins at the rainforest near the summit of Kīlauea Volcano and descends more than 3,500 feet to the Pacific Ocean over 18 miles. It’s a beautiful drive that showcases stark, ashy crater pits, hardened lava flows, steam vents, and sweeping views of the ocean. You can also stop to view the Pu‘uloa Petroglyphs and learn about this sacred spot for the people of Hawai‘i.
Planning Your Drive
Chain of Craters Road is a scenic drive with limited services.
Road Restrictions
The road is open year-round, however, it may close if there is volcanic activity in the area.
Vehicle Limits
There are no major restrictions on Chain of Craters Road. The road is paved, although there may be rough patches depending on how volcanic activity has affected the area.
Tolls/Fees
While there is no specific fee to drive Chain of Craters Road, you will need to buy a park entrance pass. They cost $30 per vehicle for a 7-day pass.
Driving Tips
There is no food, water, or gas available along the road so you’ll want to bring everything you need with you. There are vault toilets available at the Maunaulu parking area and at the end of the road.
Badlands Loop Road – Badlands National Park, South Dakota
Badlands Loop Road is the main scenic drive through Badlands National Park. It’s a 39-mile loop that takes you past jagged rock spires, colorful buttes, rugged canyons, and sweeping prairies. You can get a great overview of the park from the comfort of your vehicle on this drive.
There’s wildlife in the area, and you might spot bison, bighorn sheep, coyotes, rattlesnakes, and prairie dogs.
You can make the drive in 1-2 hours without stops, but you’ll want to allow plenty of time for stops to look at scenery, take short hikes, and to check out the visitor center along the way.
Planning Your Drive
Here are a few things to know when planning your drive along Badlands Loop Road (also known as Highway 240).
Road Restrictions
This road through the park is open year-round. After large snowstorms or other weather events, it’s possible the road may close temporarily.
Vehicle Limits
This road is RV-friendly and has several pullouts that are easy to navigate.
Tolls/Fees
There is not a specific toll to drive this road, but you do need a pass to enter the national park. The park pass is $30 per vehicle for a 7-day pass.
Driving Tips
Here are a few more tips to make the most of your drive and your stay at Badlands.
- Do this drive at sunrise or sunset: The lighting at those times of day makes them great times to take pictures and admire the rock formations. Wildlife also tends to be more active at those times of day.
- Be ready for heat: There is limited shade along this drive in the summertime. This is another reason that early in the morning, around sunrise, or later in the day, around sunset, are good times to take the drive.
- Consider the off-season: There are fewer crowds in spring, summer, and fall. Visiting the park in spring and fall can also bring more comfortable weather, rather than the heat of summer.
- There is no fuel: There are no gas stations in the park, so make sure to fill up before you arrive.
- Bring plenty of water and sunscreen: Shade and water along the route are scarce, so bring a wide-brimmed hat, sunscreen, plenty of water, and any food you want.
North Cascades Highway – North Cascades National Park, Washington
The North Cascades Highway at North Cascades National Park is a spectacular drive through one of the more remote national parks in the Lower 48. The highway is about 140 miles, running from Sedro-Woodley in the west to Winthrop in the east. But the best part of the drive is the 30 miles through the national park. You’ll see soaring mountain peaks, dense alpine forests, crystal clear glacial lakes, and overlooks that allow you to take it all in. The highway peaks at 5,477 feet above sea level at the top of Washington Pass.
Because it’s one of the more remote parks, you won’t find crowds even during the height of summer. In fact, this is a great alternative destination to more crowded parks like Rocky Mountain National Park. Check out stops like Diablo Lake, Washington Pass Overlook, and the Diablo Lake Vista Point. You’ll also drive through evergreen forests of Douglas firs, Western red cedars, and tall hemlocks. Watch for deer, mountain goats, and bald eagles.
Planning Your Drive
North Cascades Highway is a beautiful drive through the park. Here are a few things to know to make the most of your trip:
Road Restrictions
The highway, also known as SR-20, closes each winter due to snow and avalanche danger. The highway usually closes in late November, and reopens in April or early May. Actual dates are dependent on the weather each year.
Vehicle Limits
This road is suitable for RVs, and there are no special restrictions for driving it. However, some parts are narrow and have switchbacks which can make driving a larger vehicle a challenge.
Tolls/Fees: There is no entrance fee to get into North Cascades National Park, and there is no fee to drive the highway.
Driving Tips:
- Gas up: There are not many services along this road. Make sure you get fuel before heading to the park. You may also want to bring food and water for the drive, since there aren’t many places to stop.
- Check the weather: Weather conditions can change quickly, especially in mountainous areas like North Cascades. Be sure to check the forecast before you begin your drive so you know what to expect.
- Prep your vehicle: Make sure your brakes and engine cooling systems are in good shape and ready to handle steep mountain roads.
- Download maps ahead of time: Long stretches of this highway do not have good cell service. Download anything online that you may want, including music, podcasts, or maps, before you get to the park.
- Take your time: This is one of the most scenic drives in the United States. Plan to take lots of time to enjoy the drive and make plenty of stops.
Rim Drive – Crater Lake National Park, Oregon
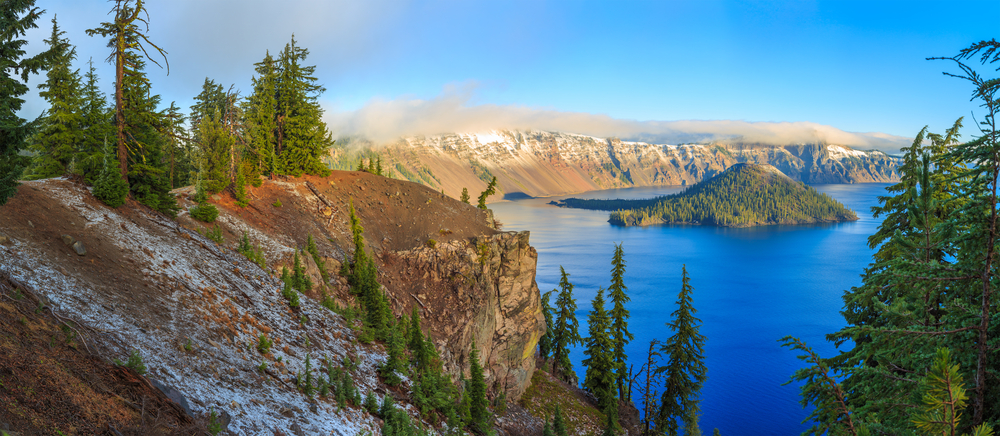
The Rim Drive at Crater Lake National Park encircles the lake itself. The road around the lake was designed to disappear into the surrounding landscape, and to disappear from view if you look across the lake at any spot along the way. There are 30 overlooks along the route, and some are places you can stop and picnic or hike. Some parts of the drive are near the rim of the crater, so you can see the lake from the road. Other parts are set back. You’ll want to allow at least two hours to make the drive around the rim. Popular stops include the Cloudcap Overlook, the Phantom Ship Overlook, and Vidae Falls.
If you don’t want to drive yourself, you can take the Crater Lake Trolley, which leaves from the Rim Village. The trolley tour is narrated, so you’ll learn even more about the lake and the area around it. The Rim Village also has a visitor center, restrooms, and places to eat.
Planning Your Drive
The Rim Drive is an excellent Crater Lake activity to help you get your bearings at the park, and to see a variety of the best views around the lake. Here is some information you may need to plan your trip.
Road Restrictions: Crater Lake gets a significant amount of snow each year, and the West and East Rim Drives, along with the North Entrance Drive, are closed after the first heavy snowfall. The roads begin to reopen in stages, usually in May. West Rim Drive opens first, then the North Entrance, and then East Rim Drive. East Rim Drive is also closed to vehicles on the second and third Saturdays of September for Ride the Rim. Cyclists, hikers, and runners take over about 25 miles of the road on those two days.
Rim Drive may also be partially closed on certain days in the summer, due to snow, rock falls, or other unforeseen events.
Vehicle Limits
RVs are allowed on the Rim Drive. There are some tight turns, so be sure to go slowly as you drive.
Tolls/Fees
You’ll need to pay an entrance fee of $30, which is good for 7 days. There is no extra fee to drive the Rim Drive.
Driving Tips:
- Check the weather: Just because the road typically opens in May doesn’t mean it will when you visit. Check the snowpack and make sure the road is open when you want to drive it. Also, check the weather forecast for the day you plan to drive it to make sure you’ll have good visibility.
- Start early (or late): Parking lots around the lake can fill up quickly during peak season. The Rim Village and several of the popular overlooks can be hard places to find parking during the day. Go early in the morning – before 9 am – or later in the day, after 4 pm, to avoid crowds.
- Drive clockwise: Most scenic overviews are on the lake side of the road. By driving clockwise around the lake (east from the Rim Village), you avoid crossing oncoming traffic to get to the overlooks.
- Fuel up: There is no gas station inside the national park. Make sure you have plenty of gas before you arrive.
- Download what you need: Cell service can also be sketchy at the park. Download any maps, music, podcasts, and other information that you need before your trip.
Skyline Drive – Shenandoah National Park, Virginia
Skyline Drive in Shenandoah National Park is the iconic road that runs through Shenandoah and the Blue Ridge Mountains. The entire drive is 105 miles, from Front Royal in the north to Rockfish Gap in the south. It eventually joins up with the Blue Ridge Parkway.
Skyline Drive has more than 75 overlooks at various points throughout the park, making it a great way to see the sights. It also provides access to the Appalachian Trail.
The speed limit along the entire trail is just 35 mph, so you’ll be going slowly enough to take in the scenery and enjoy the drive. In spring and summer, you’ll find colorful wildflowers and lots of greenery in these mountains. Fall brings brilliant autumn colors, and a dusting of snow makes winter landscapes especially pretty. Watch for wildlife, including black bears, deer, and wild turkeys.
There are a number of pull-offs, and photographers will appreciate that some face eastern sunrises while others face west to catch the setting sun. A few popular stops include the Range View Overlook, Crescent Rock, and The Point Overlook.
Planning Your Drive
Skyline Drive is a beautiful way to experience the Appalachians. Here are a few things to know as you plan your trip.
Road Restrictions
Skyline Drive is open year-round. However, the road may close temporarily during bad weather. Snow, ice, and fog can all impact driving conditions and prompt road closures.
Vehicle Limits
While there are no length limits, vehicles need to be sure they will clear Marys Rock Tunnel at Mile 32.2. The maximum clearance is 12’8″ for both lanes of the road. RVs and trailers will want to be ready to shift into low gear when they’re heading downhill.
Tolls/Fees
You will need to buy a park pass to drive through Shenandoah National Park The pass is $30 per vehicle and is good for 7 days.
Driving Tips:
- Watch for deer: Be alert and watch for deer and other wild animals that may cross the road while you’re driving so you can avoid a collision.
- Take your time: Plan on at least three hours to do the drive…but it will likely be longer if you plan to stop at many overlooks or do some hiking.
- Gas up: Gas is available at Big Meadows Wayside in the park, but it’s a good idea to gas up before you enter.
- Drive early: Driving early in the morning, especially during peak seasons in summer and fall, can help you avoid the crowds that show up at the park later in the day.
- Download stuff beforehand: Cell service in the park is limited. Download maps, music, guides, and any other information you need before you visit.
- Know what’s open: Food and restrooms are available throughout the park, but some services may be closed during the off-season.
Denali Park Road – Denali National Park, Alaska
Denali Park Road leads visitors into the heart of Denali National Park and Preserve. The road is 92 miles long, but just the first 15 miles are paved. Those 15 miles are the public driving limit – after that, the road becomes a narrow, gravel road into the wilderness. If you want to travel more of the road, which is 92 miles in total, you can take a park bus. Choose from transit buses, which just transport you to your spot, or tour buses, which provide information about the park and can help with wildlife spotting.
The Denali Park Road has amazing views of Mt. McKinley, formerly known as Denali. You’ll also see rolling tundra, rushing rivers, and glacial valleys. Watch for grizzly bears, moose, caribou, Dall sheep, wolves, eagles, and other wild animals.
Planning Your Drive
Denali Park Road sometimes has closures, and you can check the national park website to see which parts of the road are open at a given time. Here is more information you might need as you plan your drive.
Road Restrictions
Only the first 15 miles are open to private vehicles.
Vehicle Limits
There are no vehicle restrictions for the first 15 miles of the drive, up to the Savage River area. After that 15 miles, park buses and vehicles with a special permit are allowed to continue on the gravel road.
Tolls/Fees
Visitors to Denali National Park may need a park pass. Passes are $15 per person for anyone 16 and older. Those 15 and under are free. Passes are good for 7 days.
If you are taking a bus beyond Mile 15, you’ll also need a bus pass. Those range from $33 to about $145, depending on the type of bus and age of passenger.
Driving Tips:
- Be ready for the weather: The weather at Denali can change quickly, and you can go from a warm, sunny day to snow flurries in a few minutes. Pack layers and be ready for warm and cold weather on your drive.
- Prepare for gravel roads: The first 15 miles of Denali Park Road are paved. But if you’re continuing on a bus, that bus will be tackling gravel roads and possibly bumpy terrain.
- Allow plenty of time: Most visitors take a 4- to 8-hour round trip on the buses, depending on how far they go.
- Make reservations in advance: The bus rides are a popular activity in the summer. You’ll want to reserve your spot as soon as you know your plans, so you can make sure you have a spot.
- Bring binoculars: You may spot more wildlife if you have binoculars or a camera with a zoom lens.
- Stay nearby: If you stay at Riley Creek Campground or at the Denali Cabins, you can easily catch an early bus in the morning without having to travel very far.
Zion Canyon Scenic Drive – Zion National Park, Utah
Zion Canyon Scenic Drive is a beautiful way to see the cliffs and rock formations of Zion National Park. The road is the main route through Zion Canyon, and you’ll see famous sights like Angels Landing, The Grotto, and Court of the Patriarchs on your drive.
It’s important to know that this drive is limited to shuttle buses for a large part of the year, usually from March to late November, with the exception of guests staying at Zion Lodge.
Zion Canyon Scenic Drive starts near the Visitor Center in Springdale and ends at the Temple of Sinawava. It’s about 7 1/2 miles one way. You’ll get amazing views of the canyon, with the Virgin River running through the bottom of the gorge, and most of Zion’s major hiking trails can be reached from this road.
Planning Your Drive
Zion Canyon Scenic Drive is the main way visitors enter and exit the national park. Here are a few things to know about the area.
Road Restrictions
Only shuttles are allowed on Zion Canyon Scenic Drive from March to late November. Visitors can park at the Zion Canyon Visitor Center or in various paid lots in Springdale, just outside the park. They can then take the shuttle from any of those points into the park and along the drive.
Vehicle Limits
Personal vehicles are allowed in the winter months. During those months, private vehicles longer than 19 feet are not allowed past the Zion Lodge parking area without a special permit.
Tolls/Fees
Visitors must pay a park entrance fee of $35 per vehicle or $20 per person for anyone 16 and older. If you park in Springfield and take the shuttle to the park, you’ll pay the per-person fee. Park passes are good for 7 days. There is no fee for riding the shuttle through Zion Canyon.
Driving Tips:
- Arrive early: After the road is opened for private vehicles, parking lots at popular trailheads and overlooks can still be crowded. Plan to be there before 9 am to get a parking spot.
- Watch for people and animals: People frequently cross the road, especially near trailheads. Animals including deer, wild turkeys, and bighorn sheep may also be in the road, or may dart across as you’re driving.
- Check the weather: Since vehicles are only allowed during colder months, your chance of snow or icy roads increases. Check road conditions before you make your drive.
- Download ahead of time: Cell service is not reliable in most of the park. Download any maps, music, guides, or anything else you want before arriving.
From lava flows to alpine peaks, there are some amazing drives through the country’s national parks. Most of these drives give you a great overview of the park, with sweeping views of mountains, volcanoes, rock formations, and more. Try one of them on your next national park road trip!
If you don’t have your own RV to use on a trip, consider renting one from RVshare. You’ll be able to visit a national park (or several!), and camp in comfort while exploring the area.
For even more advice for your trip, check out our guide to everything you need to know about visiting national parks.

