Your RV holding tanks are what make it possible for you to use the bathroom — and the shower, and the kitchen sink — on board your RV without leaving a trail of wastewater behind. The holding tanks, as their name implies, hold wastewater from household use underneath your coach until you’re ready to dump them into a city sewer system.
There’s also a freshwater holding tank that allows you to utilize fresh water even if you aren’t able to connect to a city system. And all three of your holding tanks need specific types of care and maintenance to ensure they enjoy a long lifetime full of many happy, mess-free camping trips.
In this post, we’ll cover everything you need to know about RV holding tanks, from differentiating between black and gray water (very important!) to learning how to unstick a clog.
Read on to have your RV holding tanks explained in detail!
How Do RV Holding Tanks Work?
As mentioned above, there’s not (usually) just one holding tank for your RV — there are actually three separate holding tanks. Two are for wastewater, and one is for fresh, giving you a supply of water to use for your kitchen and bathroom sinks as well as your onboard shower taps.
Each requires certain maintenance techniques to last well; for example, you need to use special chemicals in your black water tank to help break down solid waste and keep your RV toilet odor-free.
But let’s back up. What, exactly, is the black water holding tank in an RV? And what other RV holding tanks are there?
RV Holding Tank Water Systems
Here are the three separate RV holding tank systems.
- Gray water is the waste water that flows from your sinks and shower. In other words, it’s the relatively clean wastewater that may contain soap residue or food particles, but generally avoids anything really nasty.
- Black water, on the other hand, is the wastewater that you flush down the toilet… which, of course, means that it contains human waste. ?
- Fresh water can also be stored in a separate water tank, allowing you to use your onboard plumbing system even if you’re off-grid camping or boondocking.
Each camping holding tank is separate from the others, needing to be dumped (or filled) separately and properly maintained in order to ensure they keep working (and stay as odor-free as possible!)
What Size Are RV Holding Tanks?
Many campers are curious about RV holding tank sizes, as it’s the tank capacity that has the potential to force you to end a boondocking camping trip earlier than you may have wanted to. After all, once your wastewater tanks are full (or your freshwater tank is empty), you have no choice but to get to a city sewer and water hookup to get rid of the old and restock on the new. (Despite what you saw in Christmas Vacation, it is NOT, in fact, okay to dump your RV holding tanks into a streetside sewer grate.
The good news is, your typical RV holding tank size is actually pretty reasonable. For instance, even a small Casita travel trailer may have a black water tank of 15 or so gallons, and a gray water tank of 32 gallons. (Larger RVs will, obviously, have larger holding tanks, generally speaking.)
No matter what size your tanks are — and the only way to know for sure is to consult your dealer or owner’s manual — it’s a matter of personal use as far as how long you can go between dumping sessions. For instance, if you’re traveling on your own or with your significant other only, you might be able to make the tanks stretch for a week or more; if you’ve got a whole family along for the ride and you all take onboard showers, you’ll likely need to dump after a day or two.
How Do You Dump Your RV Holding Tanks?
Now that we’ve talked about size and capacity, let’s talk about what happens when those tanks fill up: dumping.
First of all, how will you know when the tank is full?
Most RVs have an onboard sensor system that you can use to check the levels of each individual tank. In some cases, especially with smaller or older trailers, there might not be a sensor system, and it’s more a matter of… uh… just… seeing things rise to the top. (It’s not as bad as it sounds, we promise.)
Once your tanks are full, you’ll need to dump them. An important note: you don’t really want to dump your tanks before they’re full, especially in cold weather. Smaller amounts of wastewater are more likely to freeze, and a full tank uses the power of gravity to give you a nice, clean flush.
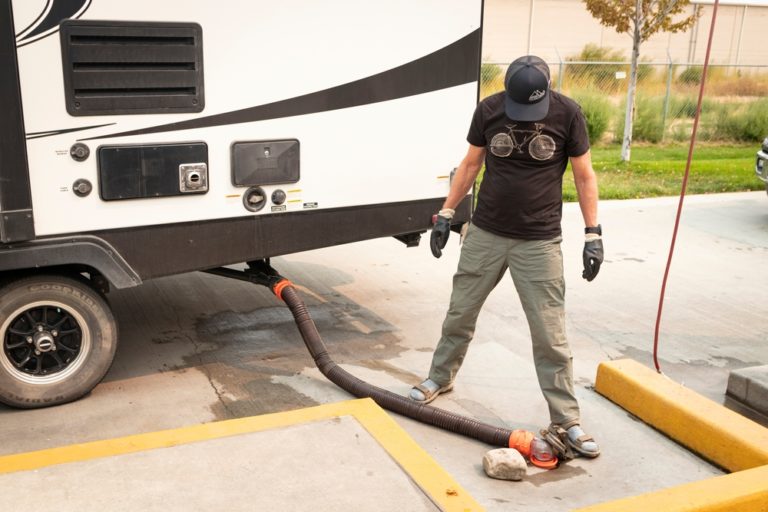
To dump your tanks, you’ll head outside of your RV to the section along the sideboard where the waste tank valves are located. You’ll see that there are two valves, one for gray water and one for black. Connect an RV sewer hose to your wastewater outlet, ensuring a nice, snug fit on both ends — the other end should feed directly into an RV dump site connected to city sewer. You may want someone to place their foot, or a brick, onto the end connected to the city sewer, just to ensure it doesn’t come loose and cause a decidedly unpleasant mess.
Once both ends of your hose are tightly connected, you can open the black tank valve. Always dump your black tank first; that way, the gray tank can wash out your hose with its relatively clean water thereafter. Once you hear the black tank’s flow trickle to a stop, you can then release the gray valve. When the tanks are fully empty, close both valves, even if you’re connected to sewer at your campsite — leaving the valves open is a great way to form a clog, as the liquid waste water will flow through but allow the solid waste to accumulate. (Add cold weather, and the only word for the result is poopsicle. Nope!)
As for your freshwater tank, you simply fill it from the city water source at its inlet — though it’s a good idea to use a potable water hose specifically made for this purpose, as it won’t impart any funky smells or tastes to your water. Potable water hoses are generally white in color, making them easy to identify, and can be purchased relatively cheaply on Amazon. Draining your tank is done by releasing the drain valve on the bottom; consult your owner’s manual for exact specifications.
How Do You Clean/Unclog an RV Holding Tank?
Considering what goes into an RV holding tank, chances are you’re probably eager to learn how exactly to clean it and keep it odor free. And what happens if you have a clog?
The good news is, RV holding tank cleaners and chemicals are pretty effective these days. You should always utilize a proper black tank deodorizing and cleaning chemical, which will help break down solid waste and keep your toilet smelling fresh. These chemicals are easy to use: simply flush a dose, along with the indicated amount of water, into your toilet, every time you dump the tank. The chemicals are available in both liquid and powder form, but either way, using them makes a HUGE difference.
There are also deodorizing chemicals available for your gray water tank, though it’s not as imperative since gray water doesn’t have the serious odors that black water does. And if your fresh water tank is contaminated or smells bad, you can use household bleach to disinfect the RV’s holding tank.
- Run the water until you smell the bleach, then let the tank sit for at least 24 hours after you have drained all the bleach water.
- Refill the tank, then run the water again, until the smell of bleach is gone. You can then refill the holding tank as usual.
If you use RV holding tank cleaner and dump your tanks regularly, chances are pretty good you won’t have to deal with a clog.
Also keep in mind that you should only utilize toilet paper specifically made for RVs, which will help you avoid a clog in the first place. Quick-dissolve toilet paper is much more gentle on your RV’s sensitive systems.
That said, if you do end up needing to unclog your holding tanks, you don’t want to use the same kind of rough-and-tumble treatment you do with your metal pipes at home. RV plumbing is a lot more sensitive, so common tactics include attempting to flush the tank with hot water (or ice water), as well as the other methods discussed in this RVshare blog post:
How to Bypass RV Holding Tanks?
Some RVers, who are turning their rigs into full-time, stationary homes, wish to bypass the RV holding tanks, to avoid having to deal with dumping and flushing the tanks so often.
In most cases, this involves replacing the RV toilet and plumbing system with a traditional, residential commode, and removing the RV holding tanks entirely.
For more on how to bypass RV holding tanks, consult with your dealer or another qualified RV professional. This kind of plumbing isn’t always intuitive or easy, so you may need to hire help.
How to Plumb RV Holding Tanks?
As mentioned above, plumbing your RV holding tanks is an undertaking that should be performed with great care. RV holding tanks and plumbing systems aren’t as steadfast and sturdy as the ones you may be used to at home!
One way to avoid serious issues with your RV holding tanks is to clean them thoroughly every so often, which has the added bonus of keeping your RV tank sensor nice and shiny (and therefore performing its job well). Here’s how to clean your RV’s holding tank sensor by running soapy water through your entire system.
And here are a few more blog posts that can help you get a handle of your RV’s plumbing system as a whole, holding tanks included:
- RV Plumbing: Parts & Fittings — Read This First
- Tools to Have on Hand for Plumbing Fixes and Projects
- Everything You Need to Know About The RV Plumbing Vent Cap
- How To Unclog An RV Toilet – What You Need To Know
How to Install RV Holding Tanks
If you’re looking at an RV holding tank replacement, the first thing you’ll need to do is remove your old tanks — which we’ll get to in just a moment. Installing your new RV holding tanks is a multi-step process that may require you to draw schematics, mount a fresh water pump, and mount your black and gray water tanks per the manufacturer’s instructions. Do It Yourself has a great guide on how to do so here, though you’ll also want to consult the instructions or owner’s manual materials that come with your new holding tanks, as well as your RV manual. In some cases, it may make more sense to hire out the job to a plumber — in which case, it’s a good idea to learn how to find a trustworthy RV repair professional before you start shopping around!
How to Remove an RV Holding Tank
To remove an RV holding tank, you’ll first want to drain the system entirely — what a mess that would be otherwise! Generally, you’ll need to remove the toilet in order to get to the black water holding tank, though you may be able to access the tanks entirely from your RV’s sideboard.
Use rubber gloves, and unscrew the fittings connecting your holding tanks to your RV. If you have any questions, consult your RV owner manual… or a professional.
RV holding tanks are by no means the glamorous parts of an RV, but they are a fact of life, and you will have to deal with them. Keep them clean and in good working order, and your self-contained RV will be all the more a home while you are out on the road.
This post contains affiliate links. RVshare may receive compensation if you make a purchase after clicking on a product link.

