
We are Jess and Shawn and we travel full time in our self converted van. For the last couple of years we’ve been helping others with their DIY builds. Our number one piece of advice to anyone who wants to build out their own home in a rig is to plan, plan, plan and PLAN some more. This includes doing the research to educate yourself. If you don’t have a basic knowledge of electronics then we recommend starting with this video we have found to be very helpful in simplifying it. Electricity Explained: Volts, Amps, Watts, Fuse Sizing, Wire Gauge, AC/DC, Solar Power and more! One important thing to figure out is your electrical needs. This is so important to get right. This one thing can make or break you on the road. You can refer to another blog of ours “Campervan Electrical System Explained” .
To keep things simple we can break it down into three categories:
What do I need for a DIY electrical system in a van?
What products should I buy for my electrical system in a van?
Where should I put the electrical system in the van?
What do I need for a DIY electrical system in a van?
Figuring out what you need comes down to your power demands. Think about the devices you’ll be using, how often and for what length of time. This includes everything from a refrigerator that runs 24/7 to an electric tooth brush charger you may only need once a month. It helps to gather all your devices and lay them out in front of you. You’ll figure out how much power each device consumes based on the info on the tag or label. We found a very helpful YouTube video which not only goes into explaining more about figuring this out but also has a free downloadable spreadsheet that will make doing these calculations easier. How Much Solar Power Do I Need for My Camper? | How to Calculate Camper Solar System Size. You’ll be able to determine the desired size of your battery bank, inverter and solar array.
Once you know the size of the system that’s needed to comfortably use all your items you’re ready to purchase your components. If your needs exceed a 3,000 watt inverter, then you may want to look into a 24 or 48 volt DC electrical system. They may require a couple additional electrical components, but will help to cut down on wire size requirements. We will go into wire sizing a little later.
What products should I buy for my electrical system in a van?
Now that you know your power demands, you can start looking into what to purchase. Depending on your needs you may find more than one brand makes it. You don’t have to stick to one brand for every component, but staying cohesive with a company can help with communication between devices.
“So, what components do I need to buy?” The basic components you’ll need to make up your power system are a battery bank, inverter, a solar array, solar charge controller, positive and negative bus bars, DC to DC, shunt, wires, terminals and lugs. Some shunts come with a mountable display for monitoring your battery level(s) and some come with a Bluetooth connection to an app on your phone or both.
You may want to include shore power charging capability. This will allow you to connect to the grid while parked up at a campground or friend’s house. When you’re not moving around for a while you might find that you need this option for charging or running larger appliances such as an AC unit. Shore power connections can be accomplished by using a separate AC to DC converter or an inverter charger combo such as the Victron MultiPlus or Renogy Inverter Charger. Each component will need an input and output fuse or circuit breaker. You will need a 12V fuse box and breakers for your AC electrical outlets. You can find RV fuse panels that will house both in one unit. You will need a master shut off switch like this one in order to shut down all output from your batteries for maintenance and storage purposes.
Before you Buy: What to Consider
One thing to consider is how accessible the customer service is for that company. In our experience of four years living in our van, we can tell you this has been important to us. There will likely come a time to contact customer service for troubleshooting or using your warranty to replace a device. If this is your first electrical system, we highly recommend choosing a company like Renogy for your main components. They have quality products and great customer service with easy to find manuals online. Some all-in-one unit brands with great customer service are GoalZero or RichSolar. A couple brands we’ve used for batteries are Renogy or Redodo. You can order through each company’s website directly or other online retailers such as Amazon.
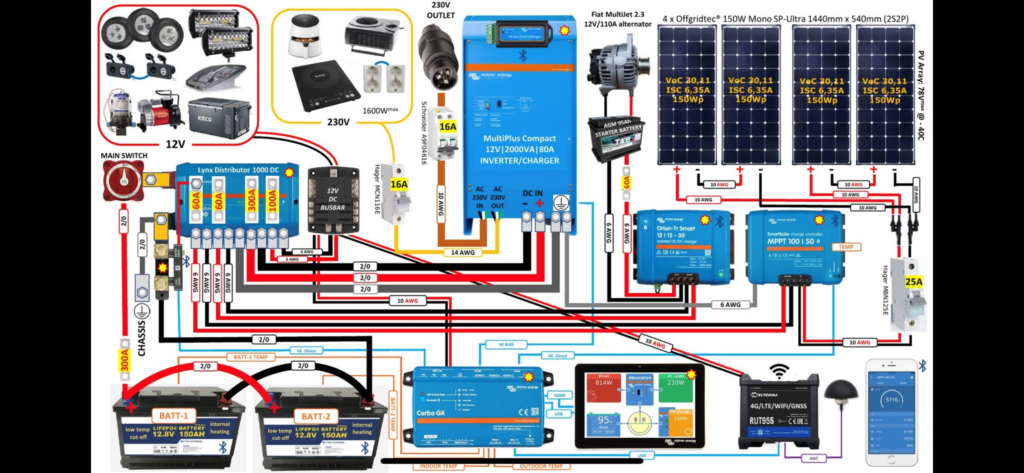
You will need to purchase the proper wire for connecting all these components. Using improper sizing will not only impact the performance of your components or cause failure but can be very dangerous causing a fire if wire gauge is too small. Make sure to follow all manufacturer guidelines provided with each component purchased or available for download on their website. You should be able to find a schematics for your setup with the recommended wire gauge and fuse size for each component. For example, with a simple Google search of “victron multiplus wiring diagram” gave me this link with photo.
You can be more specific in your Google search with whichever components you have. If for some reason you have a difficult time finding a diagram that works for your needs but you feel like you have a good understanding of electrical basics then you can always look up a wire size chart to help. There are a handful of these out there based on the component draw and distance between connections.
Choosing the Correct Wire Size for a DC Circuit – Blue Sea Systems
For example, if a fan draws 10 amps max and is 10 feet from the fuse panel, this chart suggests using 16 or 14 gauge wire depending on the component. Don’t be afraid to oversize wire in the interest of saving yourself from buying multiple spools of wire if another component requires 12 gauge wire. We’ve found 12 gauge wire is what we tend to use throughout a build to most components.
A piece of advice: when purchasing smaller gauge wire it should be fine to choose tinned or copper clad to save yourself some money. Although when purchasing larger wire such as 10 gauge or larger, we suggest springing for the pure copper because it handles more current. We also suggest to avoid using solid core wire and opt for stranded wire when building out a vehicle because it’s easier to run through the curves of the body and can handle the vibrations better.
Where should I put the electrical system in the van?
One of the first things you’ll do in your build will be the electrical and all your wiring. You will need to know from the very beginning where you’ll be putting an outlet, fan, lights, light switches and displays in order to run wires to those locations. Knowing the distance a component will be from the fuse box will help to properly size wire. You can use a Sharpie and draw on the inside of the walls where you plan to put things to help you throughout your planning process. We like to use adhesive zip tie holders to keep wires in place as well as a piece of painters tape to label each one to keep things organized.
Tip: We also don’t run wires through the metal ribs to avoid accidentally screwing through a wire when you later need that stud for attaching a ceiling or wall panel.
Designing your Electrical System Around your Van Layout
Another part of designing your layout is allowing enough space for your electrical system. Some components can be mounted sideways and some cannot. You want to make sure there is proper ventilation for your components and that nothing will fall or be shoved near where your wires are connected possibly causing a loose connection. Ideally keeping your system centrally located will help minimize length of wire needed. When trying to decide where to put your electrical system consider where other things are located that might have an affect on your electrical components. Depending on where you plan to have your water fill, sink, water tank, shower, water heater etc. and making sure it’s safe if there were a water leak. Another helpful thing to think about is keeping the system on the same side of where your factory battery is for connecting DC to DC.
Final Considerations
There is a lot that goes into planning a van build, especially your electrical system. Take your time researching, planning and putting this all together. Don’t rush this part. Figure out your power needs in order to know what to buy and decide where to put it that makes the most sense within your build. Make it neat and accessible in case you ever need to troubleshoot a component or tighten a loose connection. It’s always a good idea to learn as much as you can so you’re able to troubleshoot when things go wrong. Try reaching out to the company directly to ask questions if something isn’t working. If you’re still unsure, we recommend hiring help. This way you’ll learn from your experience with a professional for the future.
More electrical and van build resources:

