When you’re busy dreaming up your perfect RV getaway, the bathroom might be one of the last things on your mind. But if you want to avoid a… well, crappy situation, it’s a good idea to make sure you understand exactly how your rig’s pipes work.
Your camper’s holding tanks help keep your various wastewater out of sight — not to mention smelling distance. They also enable you to set up camp in the backcountry, where there aren’t any electricity or sewer hookups, which is one of the most exciting and fun opportunities in RV travel. Best of all, despite what you may have heard, operating and maintaining these portable sanitation tanks isn’t really all that difficult, time-consuming or “gross.” In fact, for the most part, it’s as simple as pulling a lever.
But we want to make sure you’re well prepared for anything that goes down on the road. (Get it?)
So in this article, we’ll explain the basics of what you need to know about your wastewater holding tanks, as well as how and where to empty them. Then, we’ll walk you through the simple process of cleaning them out, which can help if you find yourself needing to recalibrate your RV holding tank sensors or administering other repair work to your tanks.
RV Holding Tank Treatment
First of all, you need to know what’s what when it comes to your camper’s water tanks.
In all likelihood, your rig is equipped with three tanks: fresh water, grey water, and black water.
Fresh water is just that — clean, fresh water that’s pumped through your sink, toilet, and shower. So long as you keep the tank well sanitized, connect to a viable city source, and use a food grade potable water hose, the water should be safe to drink and cook with, not to mention all the other daily necessities like brushing your teeth.
Your grey water holding tank contains the runoff from the sinks and shower — in short, waste water that isn’t sewage. In some states, it’s even legal to dump your grey water straight onto the ground, as it usually contains little more than soapy residue.
Finally, the black water tank holds whatever you flush down the toilet, and therefore must be evacuated at a sewer-connected dump station.
All of these tanks are connected to a sensor inside your RV that tells you approximately how full that tank is in comparison to its total capacity. It’s a good idea to know your holding tanks’ capacity ahead of time, as this can help you estimate how long you can go between dumping sessions.
The best holding tank treatment is simply to keep up with emptying it as it fills and ensuring you do a thorough flush before and after each major camping trip. You should also flush odor-reducing chemicals down the toilet after emptying your black water tank, as these work not only to keep your living space smelling nice but also to help break down organic solids — which, without going into too much detail, is pretty important.
Finally, even if you’re hooked up to a sewer system, don’t simply leave your RV’s sewer lever open to dump as it’s used. Liquid waste might more easily pass through than toilet paper and other solid articles, which could lead to a clog. Instead, allow your tank to fill up over time and then purge it all at once.
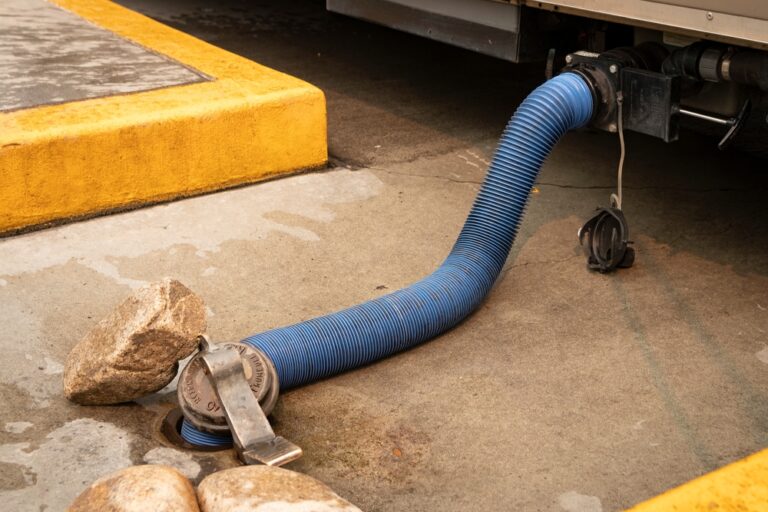
Venting a Holding Tank
The actual business of evacuating your holding tanks’ contents couldn’t be easier — simply connect the sewer hose to the port and pull the appropriate lever to release the contents. It’s a good idea to vent the black water first, followed by the grey water, as that way the soapy grey water will help push the black water through the hose and also work to help clean it.
RV water tank sanitation is very important, so make sure to use your rig’s included cleaning system (usually involving a spray hose) to thoroughly cleanse your sewer connections and tanks on a regular basis. The specific steps for this process will depend on your individual camper, as some models include custom RV water tanks, so always be sure to consult your owner’s manual.
Where Can I Dump my RV Holding Tanks?
Although it is legal in some states to dump grey water on the ground, it’s always best to dump all wastewater into the sewer system. You can do this at dedicated RV dump stations for a small fee, or at campgrounds which include sewer hookups in their nightly rates.
The Best Way to Clean RV Holding Tank
Every once in a while, your RV sewer tank’s sensor system may need to be recalibrated, or you may otherwise find yourself needing to very thoroughly clean your RV’s holding tanks — for example, if you need to place new tank fittings or even do a full tank replacement.
No matter why you need to clean your RV holding tanks, the process is the same, and it isn’t too difficult.
Here’s how to clean your RV holding tank sensors and get your tanks spic and span for whatever project you might be facing.
1. Empty your tanks.
The first step to thoroughly cleaning your RV tanks is, of course, to drain them — even if they’re not entirely full. Be sure to drain them thoroughly so they’re as empty as possible before moving forward.
2. Refill the tanks a third of the way with fresh water and add soap.
You need some water in the tanks to help clean off the sensors and the walls, so add enough fresh water to fill each wastewater tank about a third of the way. Then, you’ll add RV holding tank cleaner or even simple dish detergent; some RV owners have even suggested flushing ice down the toilet and then driving around a bit to create agitation to help “scrub” the tanks, so to speak. Either way, be sure to add your cleaning agent down the toilet as well as the sink and shower if you want to thoroughly clean both of your waste water tanks.
3. Drain your tanks and re-check your sensors.
After waiting a few hours and driving around a bit to ensure as thorough a cleansing as possible, re-drain your tanks with your RV sanitation hose and check your sensors. If everything worked as plans, each should all read completely empty — though you may sometimes have to repeat the process a couple of times to get your tanks completely clean.
As with all RV systems, your individual camper may have specific equipment and maintenance needs, but this should provide a good basic understanding of your RV’s various holding tanks and how to maintain, clean, and care for them. Here’s to many miles of camping with nice, clean, reliable pipes!

