
RV Roof Repair
“Out of sight, out of mind” is the problem with RV roofs. If you do not inspect your seams regularly and take care of your rig, you will end up with expensive-to-repair water damage.
Water damage lowers the value of your RV faster than you can say ‘repair,’ so it’s vital that you check your roof thoroughly every year. Even if you have just rubbed along a low hanging branch, while on your travels, get up there and ensure that no damage has been caused. The results of ignoring such occurrences can be devastating. A tree branch can easily puncture the rubber membrane of your roof.
Be very careful when you go up on your RV or trailer roof.
Are you sure it’s strong enough to support you? Is there a ladder at the back? If not, it most likely isn’t strong enough to be walked on. In such a case, find some plywood to lay on it so as to distribute your weight a little more.
Rubber roofing material is most commonly used today but fiberglass, aluminum and vinyl are also used on RV roofs. Rubber roofs are great and durable and should be cleaned at least four times a year; more depending on where you park your RV.
Never use a cleaner that contains petroleum solvents or citrus ingredients on your rubber or vinyl roof, as they will cause permanent damage to the surface. This would allow rain or melted snow to easily seep into seams and damage wall panels, ruin insulation and even rot framework. Mold likes to grow in these types of conditions, creating a risk of respiratory infections to those who stay in the RV.
Water also expands as it freezes. If water has seeped into cracks and seams, then freezes, it will cause further damage to your roof, leading to tears and even rips.
Even the most extremely water-damaged RV can be salvaged, as long as the shell is intact. So, if you have an old RV that you thought was done for, read below and you just may find a way to restore it yourself.
D-I-Y RV roof repair:
The first thing you need to do is to clean your roof thoroughly, so as to remove any dirt particles. You should then dry the roof as best as you can. Scrape off any debris or old roof material.
Be careful while you do this as you could easily elongate a tear, or even punch a hole through the roof. After the roof is clean, you are going to want to choose and RV roof sealant.
Choosing an RV Roof Sealant: What to Take Into Consideration
Here’s the thing: all RVs are different, so there isn’t a ‘one size fits all’ solution when it comes to roof sealant for your RV. These are the important aspects you first need to take into consideration to determine which RV roof sealant is for you:
The level of damage: Why does your RV’s roof need sealing? Is there a small leak that needs a quick and easy application of sealant, or full-blown damage over the years requiring a complete roof re-seal? Depending on your needs, your required product will vary.
The roof material: Many RV roof sealants are also targeted towards specific roof materials, such as rubber, fiberglass, or aluminum. Keep in mind that there are also two different types of rubber roof, including EPDM (Ethylene Propylene Diene Monomer) and TPO (Thermal Poly Olefin).
The level of elasticity or tear resistance required: This will vary between liquid RV roof sealants and tape sealants. According to Car Care Total, “You need to use the right materials in the right spots. A very rubbery sealant is ideal for joints that expand and contract, while a stronger or rigid sealant is great for areas that have to support some weight.”
Resistance to UV: Like many parts of your RV, your roof can also wear down over time from being exposed to harmful UV rays. Not only can you select RV roof sealing that is UV resistant, but you should also further protect your RV’s roof with a cover.
The Best RV Roof Sealers
When it comes to selecting the best RV roof sealant, there are certainly some brands which carry a better reputation than others. We’ve listed some of the most popular sealants below to help you start your search:
The rubberized leak stopper is also great for RV roof repair. It sells for $17 per gallon, and seeps into cracks and crevices to bond with the metal and create a permanent seal. It will ruin your clothes, so be careful not to spill any, as it does not wash off. Wear gloves! An old paint brush or trowel can be used to coat the roof evenly. An extra inch on all sides wouldn’t hurt either.
While you are at it, anything sticking through the roof should be sealed as well. This includes antennas and vents. These areas will develop small leaks over time and the damage caused will remain hidden for years. Coat your seams well. Every single seam, not just the damaged areas. This will prevent your roof from leaking in the future
If your roof is ripped or torn, you will need to purchase fiberglass repair tape.
- Spread the sealer all over the area that needs a patch
- Lay a piece of fiber glass tape over the patch
- Cover it with more sealer
How to repair an RV rubber roof:
Rubber roofs last longer than any other, but you will need to learn how to take proper care of them. EPDM and Dicor coatings are the most highly-rated products for this job. Other than wash with soap every so often, these roofs should be trouble-free for at least ten years. Using any petroleum-based products on these roofs will cause major damage that is irreparable. If you spot an RV with a rubber roof that looks loose or swollen, the owner most probably used petroleum products to clean it.
EPDM is an extremely durable synthetic rubber roofing membrane. EPDM roofs start to look chalky and some streaks may appear on the sides after it rains. This chalky layer protects the rubber from degradation. It is oxidized EPDM. If your roof begins to degrade, there are some products you can use to reseal it, sort of like sealing asphalt on your driveway. EPDM comes with an activator that you need to mix with the sealant.
Dicor should be applied in two coats, after using the primer provided with the sealant.
Several rubber roof kits are also available.
Use a self-leveling sealant, such as Dyco Flow Seal Caulk, to seal roof joints. Inspect all seams yearly and touch up any cracks with the sealer, to ensure you never suffer water damage.
Everguard TPO rubber roofing looks more like plastic than rubber. It is more rigid than EPDM, and has a shiny appearance. To care for this roof, you need to occasionally wash it with soap. This won’t make it last any longer though. Clean the roof thoroughly, then use a rubber roof sealer to repair any cracks.
How to repair an RV metal roof:
Before EPDM and TPO, metal was the material of choice for RV roofs. Household roof coatings will seal a metal roof just fine, but the best product by far, for metal roofs, is Kool Seal.
If you need to repair structural damage, not just seal a roof, Eternabond seam tape is the product for you. Eternabond comes in four-inch rolls that you apply over your roof’s seams. It is somewhat like duct tape, but better, so you should have it with you at all times for emergency repairs. After cleaning the roof, you should lay the tape carefully. Once it’s down, you won’t be able to peel it off.
How to repair an RV fiberglass roof:
Just like EPDM roofs, fiberglass roofs oxidize. Older model RVs with fiberglass will probably oxidize faster than the newer models. This is because the clear coat that covers the gelcoat was most probably not applied to it. Gelcoat has no structural value, but protects the hull to give it color and shine. It is sprayed onto the hull and takes the shape of the surface, like all gels. This provides that “ultra-gloss” that new RVs, cars and even boats exhibit. In order to restore the gloss, you first must clean your roof thoroughly. Use warm water to sponge the surface clean, then let it dry. In order to get the best results, the surface must be free from any oil or grease. You can use MEK (Methyl Ethyl Ketone) or acetone to remove any grease stains. Use thick rubber gloves to do this job.
Gelcoat Wax
Keep gelcoat waxed to prolong the life of the gloss. Generally, you should apply the wax in a circular motion, using a soft cloth, but application instructions may vary between brands. Let the wax dry, then buff the excess to give your RV a smooth, reflective surface. Polishing is meant to remove any pitted surfaces. Apply polish to a soft cloth and work in small areas at a time. Use a circular motion to apply the polish, until the surface becomes glassy. Always wax after polishing to improve the shine. Some polishes also incorporate wax.
If polishing fails to give your fiberglass its shine back, you may need something stronger.
- Use a de-waxer to get all the wax off your roof. Toluene also works fine.
- Apply a rubbing compound made for fiberglass and use it like polish.
- Polish, wax, then buff the surface to make it shine.
This should restore your fiberglass.
Is an electric buffer necessary?
It depends on you. Can you compound, polish, wax and buff your RV by hand? If you can, by all means do. An electric buffer will get the job done much faster though.
RV Roof Repair Restorers:
Several products claim to restore gelcoat to its original shine. The results of the products are very dramatic, but will wear off as they are similar to urethane varnish.
How to Replace an RV Roof
The first step in replacing any type of RV roof is removing the current roofing. If you have a rubber roof, that means peeling the current layer of rubber back until you see the plywood structure underneath. Because rubber is often exposed to extreme weather, you might find that some portions of the roof along the edges or around features such as the roof vent will be more stubborn.
The best tool for this project is a putty knife or your hands. Once removed, you’ll want to remove any feature that’s currently installed on your roof so you can work with a clean and open slate. Unscrew each feature and consider this as your opportunity for an RV roof vent cover replacement, since you’ll have it removed at this point anyway.
Check to see whether any of the plywood on your roof needs to be replaced. Some plywood will bow or have water damage. Other pieces might be splintered or rotting. Now’s the time to replace it. Once the plywood is ready, it’s best to clean the plywood with something like mineral spirits to remove any kind of debris.
Seam tape is recommended for all places where plywood pieces meet or where the edge or the roof meets the sides. The seam tape will reinforce weak joints and ensure a good seal between pieces of wood.
Roof Installation
To install the new EPDM or TPO rubber roof replacement, you’ll begin by painting an adhesive onto the plywood. Let the adhesive sit for a bit until it’s tacky and ready to stick. Roll your rubber roof over top and press all air bubbles out. Do this in small chunks all along the roof, cutting holes in the rubber roofing for any feature that will go back into the roof.
Finally, replace your roof’s features and seal them with the caulk we mentioned earlier. You’ll also want to apply lap sealant to the edges of the roof.
Note: The procedure is the same as above: clean, polish and coat.
Restorers are a plastic coating, (acrylic to be exact) and is water-thin to make it easier to apply than wax. It dries hard, which makes buffing unnecessary. You need at least five coats to get a good shine, which should last a year or so. When it’s time to restore the surface again, you will have to purchase a special stripper to get the old sealer off.
Maintaining your new RV Roof
Whether you’ve installed an EDPM RV roof replacement or a TPO, you’ll have to engage in some regular maintenance to make sure everything remains in working order. One of the most common materials in maintaining a rubber roof is caulking. This is like the duct tape of RV roofs in that it can be used for just about anything. We recommend regularly sealing the roof with caulking, including any features on top of the roof that protrude: roof vents, antennas or fans.
Another way to keep your roof in great shape is to apply a coat on a regular basis. You’ll know the roof needs a new layer if it begins cracking. Materials such as RV Liquid Roof will protect your rubber roof from the harsh rays of the sun. You can also purchase an RV roof cover to further protect and maintain your roof.
RV Roof Air Conditioners and Fans
We mentioned the benefits of having a roof over your head, but another benefit of having an RV is probably sitting on top of that roof – an RV roof air conditioner.
Like your RV roof, your RV’s air conditioner requires some yearly maintenance. It’s important to keep the air conditioner clean so that it has a long and “cool” life. If the coils or the louvers on the air conditioner are dirty, that can cause the air conditioner to have to work harder than normal, which will shorten the life of the air conditioner.
Finally, when you are inspecting your RV roof, you’ll want to inspect your RV air conditioner’s shroud cover to make sure that it is in good shape. Cracks in the shroud can lead to dirt and debris entering the air conditioner, which will limit the efficiency of the air conditioner’s ability to cool your RV. Some cracks in an air conditioner shroud can be patched, while others may require you to replace the shroud completely.
What’s the Best RV Air Conditioner?
As in all things RVing, different campers have different opinions when it comes to the best brand of RV air conditioner. That said, some of the biggest names in the game are Dometic, RecPro, and Coleman. To install an RV air conditioner unit, you’ll need to remove your existing unit, removing the shroud on the exterior and the interior fittings as well. A putty knife will be necessary to remove the exterior of the unit from the sealant holding it to the RV roof.
RV Vent Fans
Along with your rooftop HVAC system, there’s another series of holds in your RV’s roof. Throughout your RV are several roof vents. These vents open to allow hot air, and sometimes moisture, to escape from the RV. Traditional roof vents have a manual crank that is used to raise and lower the vent cover.
An upgrade to these roof vents may be RV roof fans. These fans fit into the same size opening as the existing roof vent, but they use 12-volt power to push air out more efficiently or to draw air in as needed.
One of the most popular RV roof fans is the Maxxair 12V Roof Top Fan and Vent, a well-known model that is widely considered to be one of the best RV roof fans on the market!
RV Roof Racks
If you’re lucky enough to have an RV equipped with an RV roof rack, you have a great place to store extra equipment while you are traveling. Luggage, bikes, your mother-in-law (!), all kinds of things can be transported on your RV’s roof if you have the right equipment.
As with other items on your RV roof, make sure your RV roof storage rack is sealed around the area where the rack is secured to the roof. Also, be sure the rack itself is secure and in good condition before attaching anything to it.
If your RV isn’t equipped with a roof rack you can purchase an aftermarket RV roof rack to install yourself. Surco makes a universal roof rack model, available on Amazon.
Always be sure to use caution and the proper materials when securing anything to your RV roof.
In conclusion:
- RV roof maintenance is essential. Nothing lasts forever, so as much as modern roofing materials are meant to last for several years, it is inevitable that you will have to take action against the damage caused by oxidation and UV rays.
- Buy an RV cover. This will save you time and money as the cover will protect your RV, especially if your area experiences extreme weather conditions.
- Repair small cracks as soon as you find them, to prevent them from becoming bigger problems. Typically, you should reseal your whole RV every five years.
- It never hurts to use a little extra sealer: better safe than sorry!
- Read your manufacturer’s instructions on cleaning and sealing whenever you undertake repairs, so as not to void your warranty.
This post contains affiliate links. RVshare may receive compensation if you make a purchase after clicking on a product link.
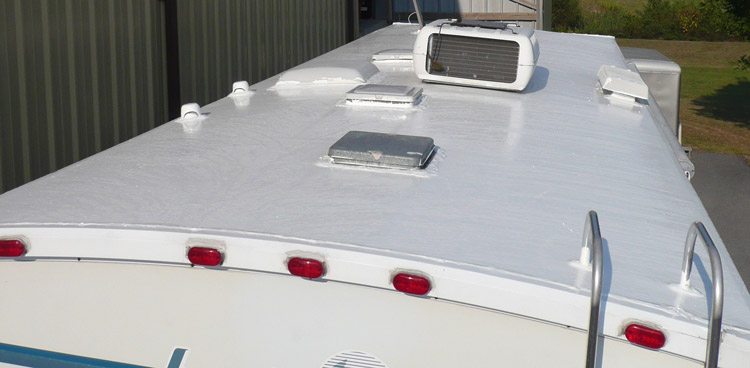