RVing Basics: Filters – How to Replace the Air, Fuel, Coolant, and Hydraulic Filters in Your RV
Regularly used and rarely thought about, filters are an incredibly important part of any RV. From the filters found under the hood of a motorhome to the ones located in the air conditioner, each and every filter has a purpose.
Of course, filters need to be replaced in order to do their job properly. Unfortunately, since filters are one of those things we don’t think about very often, it can be very easy to forget to clean or replace them. Considering the problems a clogged filter can cause, this is a huge issue.
For this reason, we highly recommend setting reminders to change your RV filters. Some individuals even choose to change all filters simultaneously in order to ensure they stay on top of the task.
Not sure where to find the filters in your RV? Need to know how to replace them? This is the article for you. Below, we’ve outlined the various filters found in RVs and how you might go about changing them out.

Different Types of RV Filters
Because they require an engine, motorhomes have a huge number of filters to think about. That said, even a travel trailer will have at least one or two filters that should be kept in mind.
Some of the filters found on RVs include:
All Motorhomes
- Engine Air Filter
- Fuel Filter
Diesel Motorhomes
- Hydraulic Filter
Most RVs
- Air Conditioner Filter
Some RVs
- Generator Air Filter
- Generator Fuel Filter
- Water Filter
Read on to learn what these filters do and how to change them in order to keep your RV’s systems in good shape.
Air Filter
The air filter is what keeps dust and debris from getting into your engine. That said, a clogged air filter doesn’t allow air to get to the engine. Considering the engine needs air to work properly, a clogged air filter is sure to lead to poor engine performance.
The following could be symptoms of a clogged fuel filter:
- Reduced fuel economy
- Slow acceleration
- Decreased towing power
- Engine overheating
Because RVs tend to drive in dirty, dusty places, air filters can become clogged very quickly. For this reason, we recommend checking your air filter at least once a year. If you drive more than 12,000 miles each year, consider a replacement every time you hit that 12,000-mile mark. If you spend a lot of time boondocking, you may need to replace the air filter even more often than that.
How to Replace the Air Filter
Fortunately, RV air filters are relatively easy to replace. Simply locate the filter box beneath the hood of your RV, pop the box open, remove the old filter, and replace it with a new one. If you aren’t sure which filter you need, check the product number on the side of the old filter.

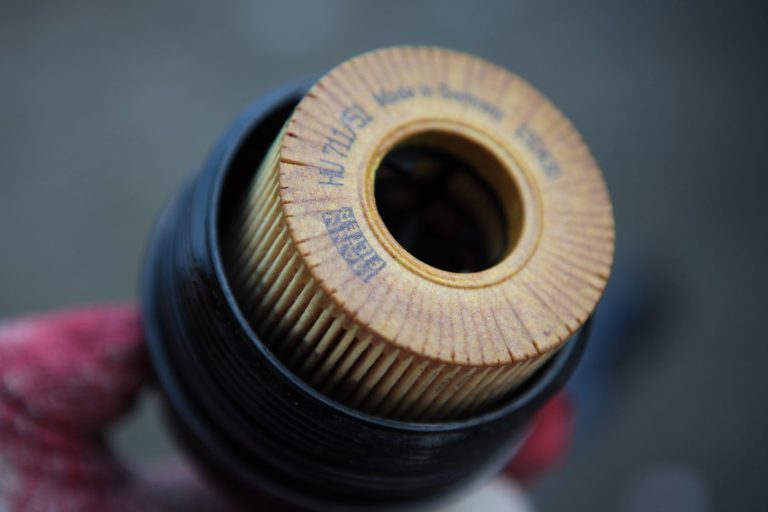
Fuel Filter
Your fuel filter is important because it ensures only clean fuel gets to your RV’s engine. The only problem? Fuel filters can become clogged over time. When your fuel filter becomes clogged, it doesn’t allow enough gas to get to the engine, leading to serious issues.
Some issues you might experience with a clogged gas filter include:
- An engine that hesitates, sputters, or surges
- Hard starting
- Stalling
- Misfiring and a rough idle
- Damaged fuel pump
While every manufacturer has slightly different guidelines, your best bet is to replace your fuel filter every 20,000 miles or so. Keep in mind that a fuel filter that has merely been sitting for a while can become clogged, so any time since the last filter change should also be taken into account. Generally speaking, a fuel filter should be changed at least every two years, even if you don’t hit that 20,000-mile mark.
How to Replace the Fuel Filter
Find your filter near the engine, or in the access panel near the engine. Gather your tools and several rags to contain spilled fuel, and carefully follow the instructions for changing an RV fuel filter in this video.
A/C Filter
An air conditioner is a feature just about every RV has these days, and every single one of these air conditioners comes with a filter. These filters keep dirt and dust from making its way into your air conditioner and ductwork, and they ensure the A/C lasts for years to come. For this reason, you don’t want to run the air conditioner without a filter, even when the filter becomes clogged.
Clogged RV A/C Filters can cause the following problems:
- Weak airflow
- Air conditioner freezes up
You should be able to see when your RV air conditioner filter becomes clogged, as it will look visibly dusty and dirty. For some, this will be a weekly occurrence during the summer months. For others, it may only happen once in a while. Either way, when you see that buildup or when you start experiencing the symptoms above, be sure to clean or replace your filter right away.
How to Replace the A/C Filter
It is actually possible to clean your RV A/C filter many times before it must be replaced. To clean your air conditioner filter, simply run it under clean water to remove the buildup and let it dry in the sun. Once the filter develops holes or tears, you will need to replace it with a new one.
Hydraulic Filter
Many who own diesel motorhomes will also need to remember to change their hydraulic filters. These filters are used to clean the hydraulic fluid used to keep the engine hydraulics up and running. The system should include both an external spin-on filter as well as an internal filter.
If these filters get too dirty you could end up with important components that don’t work while driving. For this reason, it is important that you replace the hydraulic filters on the schedule determined by your motorhome’s manufacturer.
How to Replace the Hydraulic Filters
Replacing your hydraulic filters is a difficult and messy business that most people will probably want to leave to the professionals.
If you do decide to do it on your own, you will want to wear old clothes and ensure you have plenty of old rags for cleanup. You will need to pump out the old hydraulic fluid and replace it with new fluid, so keep that in mind.
This video provides good instructions for fluid replacement. Follow his instructions and be sure to replace the filters while you’re at it. This forum also has good detailed instructions for hydraulic filter replacement.
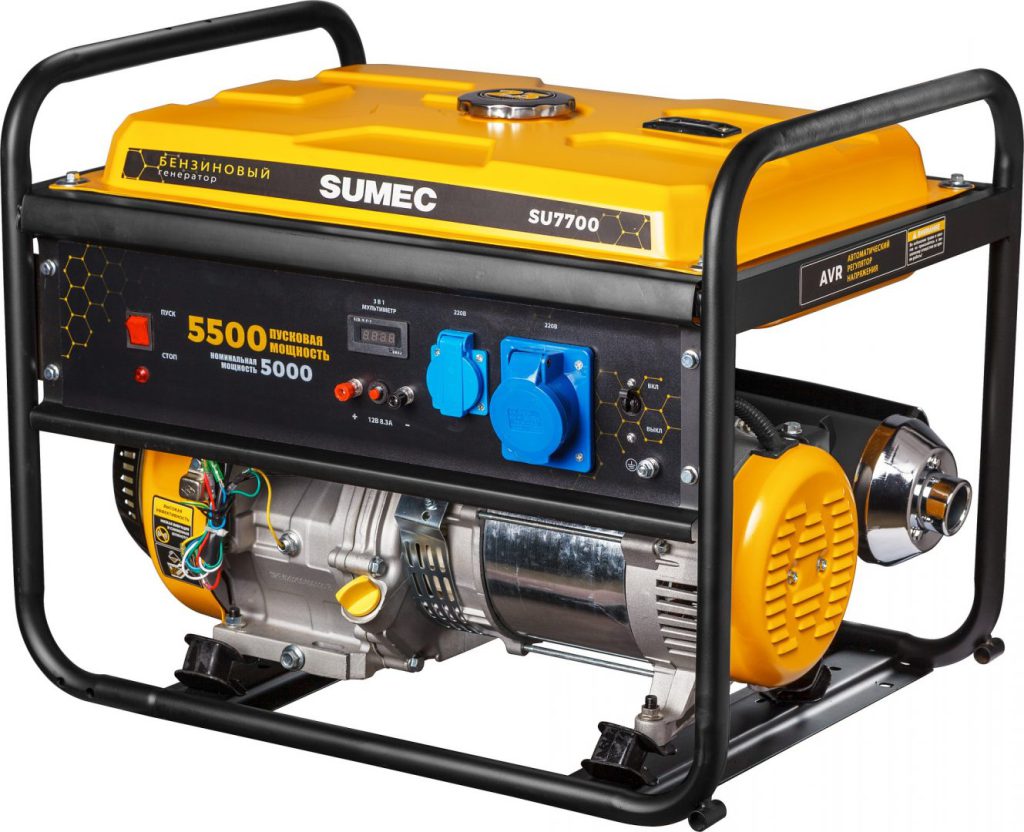
Generator Air Filter
If your RV comes equipped with a generator, you will want to be sure to keep up with the generator maintenance. This includes replacing the generator air filter, which cleans the air making its way to your generator motor.
A generator with a dirty air filter might show the following symptoms:
- Sputtering
- Dies periodically
- Doesn’t create as much power as it should
Generator air filters should be replaced every 140–500 hours. This might need to be done more frequently if you spend time in dusty areas such as the desert, or sandy spots such as the beach.
How to Replace the Generator Air Filter
Replacing your RV generator air filter is as simple as popping the air filter box open, slipping the old filter out, and putting a new one in its place. The air filter box might be in a different location from one generator to the next, and the way the box is held closed may vary as well. That said, this video provides good instructions that can help get you started.
Generator Fuel Filter
Another generator maintenance item that shouldn’t be glossed over? The generator fuel filter. As you might have guessed, the fuel filter is responsible for getting rid of contaminants in fuel before it reaches the generator engine.
If your fuel filter is clogged your generator might do some or all of the following:
- Sputtering
- Dies periodically
- Doesn’t create as much power as it should
- Won’t start
That said, as long as you replace your fuel filter every 500 hours or at least once a year, you should never experience any of these symptoms.
How to Replace the Generator Fuel Filter
The fuel filter in your generator is also fairly easy to replace:
- First, find your fuel line.
- Remove the clamp holding the line to the filter.
- Pop the line free and plug it to prevent dripping.
- Remove the rubber grommet around the filter.
- Use a socket wrench to remove the old filter.
- Use some thread sealant on the new filter and use a socket wrench to screw it back into place.
- Unplug the fuel line, push it onto the filter, and put the clamp back in place.
This video might make it easier to understand the process.

Water Filter
The last filter we are going to discuss today is your RV water filter. Most RVs do not come with water filters. That said, we absolutely recommend using a filter of some sort on your RV water system in order to ensure safe and drinkable water no matter where you roam.
A clogged water filter can cause the following issues:
- Low or no water pressure
- Sediment in water
There are a huge number of filter types out there, and each one has different guidelines when it comes to when they should be replaced. Pay attention to the manual included with your water filter and make sure to replace the filter when the instructions advise you to.
How to Replace the RV Water Filter
As mentioned before, RV water filters come in a variety of shapes, sizes, and styles. There is no one way to replace an RV water filter. Therefore, you will need to consult your owner’s manual to learn how to go about this.
There you have it, a nice list of filters you should be checking and replacing in your RV. That said, this list is not complete, and there is a good chance your RV has filters that aren’t listed here. For that reason, you will also want to check your owner’s manual for a maintenance schedule and be sure to stick to it in order to ensure excellent performance.

