When you own an RV, it is incredibly important that you keep up with the maintenance. In the case of motorhomes, one of the most important maintenance tasks is making sure the oil is doing its job. To do this, you absolutely must keep up with your RV oil change schedule.
As is the case with any RV maintenance task, it is helpful to understand why the job is important. Of course, you’ll also need to know when to change the oil and how to go about it. In this article, we will address all of these questions so you can go into your next RV oil change with confidence.
Why Change the Oil in Your RV?
First, let’s talk a bit about why it is important to keep up with your RV oil change schedule. We know it can be a bit tempting to put it off, but if you understand the why behind these oil changes, perhaps you’ll be less tempted to procrastinate and more willing to get the job done.
You see, RVs are super heavy vehicles, which means the motor works hard to get you from point A to point B. Towing a car behind your motorhome adds to the work your engine is doing. Since oil is what keeps your motor well-lubricated, you want to ensure your RV has plenty of it.
On top of having the correct amount of oil in your RV, you also want that oil to be clean. When your motorhome is working hard towing a car or driving up an incline, the engine gets hot. This causes the oil to thin out, and dirty hot oil can cause damage to components.
Finally, there is the fact that oil will degrade over time, meaning it no longer offers the same lubrication it once did. If not taken care of, this eventually wears out seals and other engine components.
How Often Does RV Oil Need to be Changed in a Gas Motorhome?
Clearly, keeping your RV oil clean and topped up is important, but how often should you be changing the oil in your gas motorhome? To an extent, this depends on the type of driving you’ll be doing.
If you only take long trips on flat highways, your oil will last longer. Meanwhile, those who take lots of short trips in the motorhome and those who drive on inclines often might need to change their oil a bit more often. Either way, it’s better to change your oil earlier than necessary than to change it too late.
Generally speaking, mechanics recommend that you change the oil in your RV at least every 8 months. If you use your RV a lot, you will need to change the oil more often.
The best way to know when to change your RV oil is to watch your odometer. Your RV manufacturer will specify how many miles you should drive between oil changes, but the number is usually somewhere between 3,000 and 5,000 miles for gas motorhomes. By keeping an eye on your mileage, you can make sure you change the oil when you get close to the requirement.
If you drive in hilly or mountainous areas, or if your RV is loaded to the max, you should change the oil more often.
A Word about Diesel RV Oil Changes
The above information on when to change your oil is intended for those with gas motorhomes, but not every motorhome is a “gasser.” So when do you change the oil in a diesel RV? Well, in this case, the rules change a bit.
Diesel engines do not need oil changes as often as gas engines. In fact, many diesel vehicles can go up to 20,000 miles before needing an oil change as long as the motor is used on a regular basis. Of course, you will want to see what your manufacturer says on the subject and use that number as your guide.
Another thing to note about oil changes in diesel engines is that the oil should always be changed before the RV sits for any length of time. The oil used in diesel vehicles tends to get sludgy if it sits too long and is dirty. Obviously, forcing sludgy oil through your RV’s system is never a good idea. Therefore, you will want to make sure your oil is as clean as possible if you plan to store your diesel RV for more than two months.
Signs Your RV Oil Needs to Be Changed
Okay, so you can watch your odometer to know when to change your RV’s oil. But what if you don’t know when the rig last had an oil change or what the odometer read at that point? In that case, we recommend getting the oil changed no matter what, just to be on the safe side.
However, there are some things you can look for to know if the oil might need to be changed.
Oil Color
When oil is fresh, it will be a nice golden brown color. Old, dirty oil will turn dark brown or even black. Take a look at the color of your motor oil to get an idea of how old and dirty it might be.
Oil Level
While you’re checking the color of your oil, you should also look at the oil level. If the level is low, top it off. If it continues to lose oil, you either have a leak or the engine is burning oil.
Take the RV in for service right away if you suspect an oil leak. If you feel the engine is burning oil, know that many older motorhomes do this. Just make sure to top it off regularly so the level never gets too low.
Engine Noise
Listen carefully for engine noise as you drive. If your oil is so old that your engine is making noise, it’s probably way past due for an oil change. That said, those noises can be a helpful indicator if you just got a new-to-you RV.
Sounds you might hear include grinding, knocking, and squealing. If you hear these sounds, stop and check out what’s going on with your oil right away.
Exhaust Smell or Smoke
Do you see smoke coming out of the exhaust pipe? Is the smell of burning oil coming from your tailpipe or under your hood? These are all signs of an oil leak and should be checked out immediately before you travel anywhere.
RVing 101: How to Change Your RV’s Oil
Now it’s time to talk about how to change the oil in an RV.
Many people change their RV oil themselves in order to save money and eliminate some errands from their lives. We totally get this. There are some things you’ll want to consider and things you’ll want to know before taking on the job. That’s what we’ll cover here.
Ensure that It’s Allowed
First and foremost, you will want to make sure you’re allowed to change your RV’s oil wherever you have parked it. Many campgrounds have rules against oil changes being performed on their property because changing your oil could result in a spill. Not only that, there are also some towns out there that don’t allow DIY oil changes whatsoever.
Purchase the Right Oil
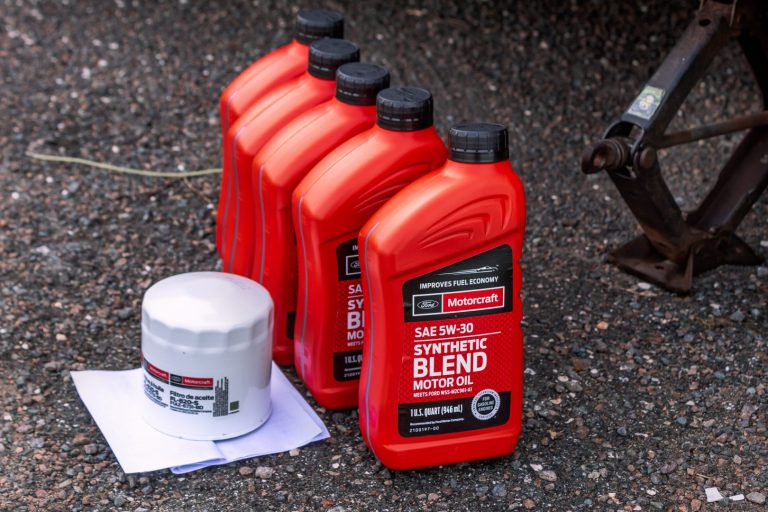
Using the correct type of motor oil is incredibly important. Using the wrong type could quickly result in a damaged engine, something you definitely don’t want. Consult your owner’s manual to learn the kind of oil your vehicle requires, and be sure to purchase the correct amount of that type of oil.
Another thing you’ll have to decide is whether to use synthetic or conventional oil. For the most part, synthetic is the way to go when it comes to motorhomes, as it reduces oxidation and flows faster in cold temperatures. However, motorhomes that are more than ten years old might not run well on synthetic oil as they need the thicker consistency of conventional oil.
Gather Your Supplies
Before you begin this DIY project, you’ll want to make sure you have everything you need to change your RV’s oil. You’ll need a pan or container that can hold around 8 quarts of oil. You’ll also want some sort of absorbent pad to catch any drips, a high-quality oil filter, an oil funnel, an oil funnel wrench, a wrench and socket, and, of course, your oil.
Perform the Oil Change
Now it’s time to get down to business and do the RV oil change. This is very much like changing the oil on a car or truck. If you’ve done that before, you should be able to get the job done fairly easily.
- Park the RV on a flat surface, making sure it is in park and the emergency brake is on.
- Place the oil drain pan (or other catch container) beneath the drain plug on the RV oil pan.
- Use the wrench and socket to loosen the bolt on the oil pan, stopping to finish untwisting the bolt by hand in order to avoid losing it in the dirty oil.
- Once the bolt is removed, let the dirty oil drain into the container below, making sure every drop possible drains out.
- Being careful not to spill, remove the oil filter from your RV, using the oil funnel wrench if necessary.
- Rub a small amount of fresh oil on the gasket of the new oil filter and screw the new filter on.
- Replace the drain plug on the oil pan and tighten it.
- Remove the engine oil cap under the hood and place the funnel in the tube under the cap.
- Use the funnel to add the correct type and amount of oil to the vehicle.
- Check the oil dipstick to ensure the oil level is correct and add more if necessary.
Dispose of the Oil Properly
Finally, you will need to make sure you dispose of the old oil from your RV properly. You never want to pour oil down the drain or into waterways, nor do you want to dump it on the ground.
Instead, you should pour the oil into plastic jugs, cap them off, and take the jugs to a hazardous waste drop-off location or an auto service center that accepts dirty oil for recycling.
Where to Get an RV Oil Change
Sometimes it’s just easier and more convenient to let someone else do the work for you. The good news? Many places are happy to change your oil.
To find a service center that can take care of motorhome oil changes, we recommend searching for “RV oil change near me”. This should pull up some options.
If the search somehow doesn’t pull up any helpful results, consider calling local Walmart stores. Many Walmart Auto Care centers are equipped with large enough bays to perform RV oil changes and will be happy to help.
Other places that might be able to change your RV oil include Camping World and even some Jiffy Lube locations. The key is to call around until you find a place that can manage RVs.
Lastly, there is the option of calling a mobile mechanic to help. If you find a mobile mechanic, they will be able to help you wherever your RV is parked, removing the need to drive it anywhere.
Yes, changing your RV oil is important, and might be even one of the most important motorhome maintenance tasks. Fortunately, it isn’t a terribly difficult job, and you should be able to do it on your own or find someone to do it for you fairly easily.
Why not make a plan for your next motorhome oil change today? Doing so will help ensure your engine is well taken care of and lasts for many years (and trips) to come.
How to Replace the Air, Fuel, Coolant, and Hydraulic Filters in Your RV
Regularly used and rarely thought about, filters are an incredibly important part of any RV. From the filters found under the hood of a motorhome to the ones located in the air conditioner, each and every filter has a purpose.
Of course, filters need to be replaced in order to do their job properly. Unfortunately, since filters are one of those things we don’t think about very often, it can be very easy to forget to clean or replace them. Considering the problems a clogged filter can cause, this is a huge issue.
We highly recommend setting reminders to change your RV filters. Some individuals even choose to change all filters simultaneously in order to ensure they stay on top of the task.
Below, we’ve outlined the various filters found in RVs and how to change them.
Different Types of RV Filters
Because they require an engine, motorhomes have a huge number of filters to think about. That said, even a travel trailer will have at least one or two filters that need to be changed.
Some of the filters found on RVs include:
All Motorhomes
- Engine Air Filter
- Fuel Filter
Diesel Motorhomes
- Hydraulic Filter
Most RVs
- Air Conditioner Filter
Some RVs
- Generator Air Filter
- Generator Fuel Filter
- Water Filter
Read on to learn what these filters do and how to change them in order to keep your RV’s systems in good shape.
Air Filter
The air filter keeps dust and debris from getting into your engine. A clogged air filter doesn’t allow air to get to the engine. Considering the engine needs air to work properly, a clogged air filter is sure to lead to poor engine performance.
The following could be symptoms of a clogged fuel filter:
- Reduced fuel economy
- Slow acceleration
- Decreased towing power
- Engine overheating
Because RVs tend to drive in dirty, dusty places, air filters can become clogged very quickly. We recommend checking your air filter at least once a year. If you drive more than 12,000 miles each year, consider a replacement every time you hit that 12,000-mile mark. If you spend a lot of time boondocking, you may need to replace the air filter even more often than that.
How to Replace the Air Filter
Fortunately, RV air filters are relatively easy to replace. Simply locate the filter box beneath the hood of your RV, pop the box open, remove the old filter, and replace it with a new one. If you aren’t sure which filter you need, check the product number on the side of the old filter.
Fuel Filter
Your fuel filter is important because it ensures only clean fuel gets to your RV’s engine. Fuel filters can also become clogged over time. When your fuel filter becomes clogged, it doesn’t allow enough gas to get to the engine, leading to serious issues.
Some issues you might experience with a clogged fuel filter include:
- An engine that hesitates, sputters, or surges
- Hard starting
- Stalling
- Misfiring and a rough idle
- Damaged fuel pump
While every manufacturer has slightly different guidelines, your best bet is to replace your fuel filter every 20,000 miles or so. Keep in mind that a fuel filter that has merely been sitting for a while can become clogged, so any time since the last filter change should also be taken into account. Generally speaking, a fuel filter should be changed at least every two years, even if you don’t hit that 20,000-mile mark.
How to Replace the Fuel Filter
Find your filter near the engine, or in the access panel near the engine. Gather your tools and several rags to contain spilled fuel, and carefully follow the instructions for changing an RV fuel filter in this video.
A/C Filter
An air conditioner is a feature just about every RV has these days, and every single one of these air conditioners comes with a filter. These filters keep dirt and dust from making their way into your air conditioner and ductwork, and they ensure the A/C lasts for years to come. You don’t want to run the air conditioner without a filter, even when the filter becomes clogged.
Clogged RV A/C Filters can cause the following problems:
- Weak airflow
- Air conditioner freezes up
You should be able to see when your RV air conditioner filter becomes clogged, as it will look visibly dusty and dirty. For some, this will be a weekly occurrence during the summer months. For others, it may only happen occasionally. Either way, when you see that buildup or when you start experiencing the symptoms above, be sure to clean or replace your filter right away.
How to Replace the A/C Filter
It is actually possible to clean your RV A/C filter many times before it must be replaced. To clean your air conditioner filter, simply run it under clean water to remove the buildup and let it dry in the sun. Once the filter develops holes or tears, you will need to replace it with a new one.
Hydraulic Filter
Many who own diesel motorhomes will also need to remember to change their hydraulic filters. These filters are used to clean the hydraulic fluid used to keep the engine hydraulics up and running. The system should include both an external spin-on filter as well as an internal filter.
If these filters get too dirty you could end up with important components that don’t work while driving. For this reason, it is important that you replace the hydraulic filters on the schedule determined by your motorhome’s manufacturer.
How to Replace the Hydraulic Filters
Replacing your hydraulic filters is a difficult and messy business that most people will probably want to leave to the professionals.
If you do decide to do it on your own, you will want to wear old clothes and ensure you have plenty of old rags for cleanup. You will need to pump out the old hydraulic fluid and replace it with new fluid, so keep that in mind.
This video provides good instructions for fluid replacement. Follow his instructions and be sure to replace the filters while you’re at it. This forum also has detailed instructions for hydraulic filter replacement.
Generator Air Filter
If your RV comes equipped with a generator, you will want to be sure to keep up with the generator maintenance. This includes replacing the generator air filter, which cleans the air making its way to your generator motor.
A generator with a dirty air filter might show the following symptoms:
- Sputtering
- Dies periodically
- Doesn’t create as much power as it should
Generator air filters should be replaced every 140–500 hours. This might need to be done more frequently if you spend time in dusty areas such as the desert, or sandy spots such as the beach.
How to Replace the Generator Air Filter
Replacing your RV generator air filter is as simple as popping the air filter box open, slipping the old filter out, and putting a new one in its place. The air filter box might be in a different location from one generator to the next, and the way the box is held closed may vary as well. This video provides instructions that can help get you started.
Generator Fuel Filter
Another generator maintenance item that shouldn’t be glossed over? The generator fuel filter. As you might have guessed, the fuel filter is responsible for getting rid of contaminants in fuel before it reaches the generator engine.
If your fuel filter is clogged your generator might do some or all of the following:
- Sputtering
- Dies periodically
- Doesn’t create as much power as it should
- Won’t start
As long as you replace your fuel filter every 500 hours or at least once a year, you should never experience any of these symptoms.
How to Replace the Generator Fuel Filter
The fuel filter in your generator is also fairly easy to replace:
- First, find your fuel line.
- Remove the clamp holding the line to the filter.
- Pop the line free and plug it to prevent dripping.
- Remove the rubber grommet around the filter.
- Use a socket wrench to remove the old filter.
- Use some thread sealant on the new filter and use a socket wrench to screw it back into place.
- Unplug the fuel line, push it onto the filter, and put the clamp back in place.
This video might make it easier to understand the process.
Water Filter
The last filter we are going to discuss today is your RV water filter. Most RVs do not come with water filters. However, we absolutely recommend using a filter of some sort on your RV water system in order to ensure safe and drinkable water no matter where you are.
A clogged water filter can cause the following issues:
- Low or no water pressure
- Sediment in water
There are a huge number of filter types out there, and each one has different guidelines when it comes to when they should be replaced. Pay attention to the manual included with your water filter and make sure to replace the filter when the instructions advise you to.
There you have it, a nice list of filters you should be checking and replacing in your RV. Just remember, this list may not be complete, and there is a good chance your RV has filters that aren’t listed here. You will also want to check your owner’s manual for a maintenance schedule and be sure to stick to it in order to ensure excellent performance.
