If your RV did not come with a rearview camera, don’t despair! This article will help you choose the perfect backup camera and tell you how to install it.
First off, be warned that there are a lot of inferior, poor-quality backup cameras available on the market today. These cheap units are often poorly rated and a waste of money. For expert advice on this subject, we turn to long-time RVers, Jerry & Cynthia of RV Roadtrip.
They recommend avoiding brands such as Pyle, XO, Hootoo, Peak, and Boyo. They found that these units performed very poorly and caused far more frustration than they were worth.
Jerry & Cynthia’s pick for the best RV backup camera is the Rear View Safety RVS-7770613 which can be purchased through from the Rear View website or Amazon.com.
This 7″ LCD color rearview backup camera offers both audio and video and is the leading manufacturer of backup cameras in the U.S. The folks over at RV Road Trip loved their solid reputation and the quality product that they provide.
When you receive your camera and open the box you will find the following items:
- A 130-degree wide-angle color backup camera. This camera is waterproof and infrared.
- An LCD 7 ” rear view color monitor along with a mount, a stand, and the wire.
- A 3-channel controller along with a wireless remote.
- A 66-foot extension cable, a power wire, and a double RCA cord to connect your audio, video, and power.
Before you start, be sure to make sure EVERYTHING you need is in the box. You don’t want to discover during the installation that something is missing. Also, test it all to make sure it is working prior to your installation. If you check it before you mount it you will know if you need to fix something other than a faulty unit.

Installation:
Here are the tools you will need for the installation of the RV backup camera:
- A drill with a 3/4 bit
- A screwdriver set
- Some RV sealant such as ProFlex
You will also need to be in a calm, patient mood because anything you do with an RV takes time. Be sure to have some wire ties handy as they can help secure things underneath your rig. If all goes well you will need about 2 hours for this install — remember, every RV is different.
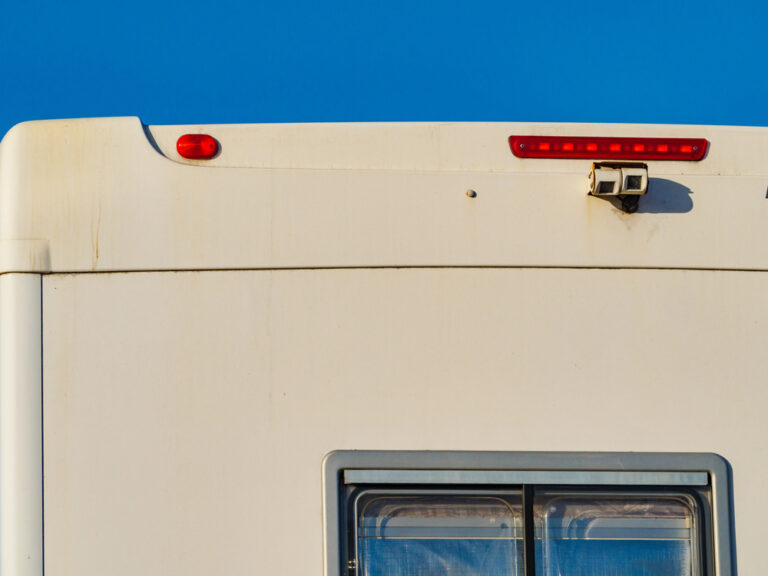
In most cases, the rearview camera on an RV is mounted just below the clearance lights. Check online for examples before you start. If your clearance lights are low it shouldn’t be a problem, but again this will vary from rig to rig.
- Grab a pencil and mark where you plan to drill the 3/4-inch hole for your wire. Make SURE there aren’t any other wires in the way. You do not want to cut through anything and cause problems. Check for wall studs that might be in the way. Once you know everything is clear you can drill the hole.
- Choose how to route your wires. You can use the ceiling rafters or travel underneath the rig. It really depends on your RV. You can also drill through your kitchen cabinets and go through the floor if needed. Spend time accessing the best route PRIOR to drilling your holes.
- Drill holes as necessary and route the wire from the inside to the outside. Be sure to fill the holes up with the ProFlex sealant. You do not want bugs or cold air coming in.
- Align the camera, connect the wire, and test the angle of the view. Make sure to adjust it several times to check your options. Once you have chosen the specific spot for the camera screw it into place. You will need to use sealant all around to avoid moisture build-up.
- Plan your wire route for under the RV. Be sure to avoid areas of heat or pinch points. You also want to find a route that allows you to mount the wire with zip ties.
- If you have an extra cord you will need to wind it and store it somewhere near the dash. Some people tuck it in or under the dash.
- Now you need to mount the monitor in a place you can easily see when driving. Be sure you have a cigarette lighter plug close by as this will be your power source. You can also choose to only use your rearview camera when you are in reverse. If you choose this option you will need to connect your backup light with the blue wire offered in your kit. If you want it on all the time you will need to twist the red and blue wires together so it will be on any time you have the monitor plugged into the lighter outlet.
- Test the unit. What do you see? Is the angle of the camera correct? Is the monitor in a comfortable position? Check the wires again to make sure they are all properly connected and secured. The Rear RV Safety unit comes with a 1-year warranty and can also be hooked to two other cameras if you want side views, etc. You could add one to your entry door or anywhere else you want an outside view.
So, what do you think? Would you install your own backup camera or would you hire someone to do it? Do you have a particular camera unit you recommend? Do you have one you would prefer to avoid?
Place your comments in the box below and then please share this article with all your RV-loving friends! You can tweet, pin, post or share. Regardless of how you share this article, be sure to come back for more articles about the RV life!
Via: RV Road Trip
