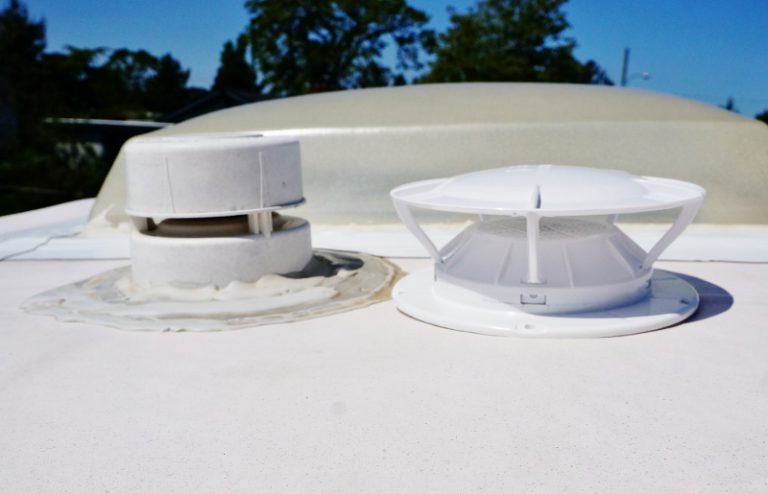

If you ever go up on the roof of your RV, you’ll likely find you have two vents over the bathroom area: the bathroom vent and the sewer vent. Both of these are necessary, and properly caring them is a very important part of RV maintenance.
Your RV plumbing vent cap is an RV accessory that isn’t often thought of, but its everyday function is an important one. It helps the entire RV plumbing system work effectively, and most importantly for those inside your motorhome, it helps displace odors coming from your gray and black water tanks.
Your bathroom roof vent cap has a similar purpose, as it provides for good air circulation throughout your rig and helps to push stale air outside. Having a good cover on your roof vent will allow you to leave your vent open even when it’s raining, without any moisture making its way into your RV. As you can imagine, this is perfect for those who are without A/C on a regular basis, as it provides ventilation and makes hot rainy days much more manageable. The cover also assists in keeping away pests and debris, which can help maximize the life of your vent.
Vent Cap Maintenance
One of the most important aspects of caring for these vents is ensuring the vent caps are clean and free from cracks or other issues. This is easy enough to do when doing your regular roof inspections, and doesn’t take much extra time at all. Simply take a glance at the caps and see if there are any cracks or holes, clean any debris from the vent caps if necessary, and it’s done.
If you do happen to find a break in either vent cap, or if the sewer cap is excessively clogged, it’s probably time for a replacement.
Choosing an RV Sewer Vent Cap
Before you begin the replacement process, you’ll want to look into the various types of RV sewer vent caps in order to ensure you’re getting what you really want. After all, why put in a replacement that you don’t love?
You can find one at most RV or camping stores or online a Amazon.com and other sites. You’ll want to make sure the cap you purchase will fit on the existing vent pipe.
Surprisingly, there are a few different options when it comes to RV sewer vent caps. There are, of course, the typical caps which come in a variety of colors and tend to get the job done just fine. However, there are also some options that do an extra good job of pulling tank smells up and away from your home. These include the much-loved Cyclone vent caps, which create an awesome vacuum using only the wind, as well as other types of “siphon caps” which employ different designs but do essentially the same thing. There are even solar-powered options that use a small solar panel to collect enough power to pull smells up using electricity.
Replacing an RV Sewer Vent Cap
Once you get the vent cover, you’ll want to gather the rest of the necessary tools. These include:
- A dry rag and paper towels
- Screwdriver
- Putty knife
- Drill gun or electric screwdrivers
- Sealant and caulk gun
- Mineral spirits for cleaning
*Keep in mind that regular household caulk is typically not safe for your RV. Read your owner’s manual if you’re unsure, but typically rubber, aluminum or fiberglass is safe to use on your motorhome.
First, remove your damaged RV plumbing vent cap. If it’s missing, you can skip this step! Start by prying up the old sealant surrounding the cover using a putty knife or screwdriver. You’ll want to also ensure you’re removing sealant from the screws also, as the screws need to be removed. You can loosen those with your drill gun and then lift off the entire vent cap.
There will likely be remaining sealant, so you’ll want to continue to use the putty knife to remove it. Once you’ve removed all you can, you can use mineral spirits and paper towel to scrub some of it away and clean the RV plumbing vent pipe itself. Once it’s as clean as you can get it, use the dry rug to give it a final scrub, removing remaining mineral spirits and excess debris.
After that, you’ve earned a break! Give yourself a half hour before continuing the project, so that the roof can dry and the cleaning product is completely gone before you place the new RV plumbing vent cap. Once everything is spic and span and dry, you can fit your new cap on the sewer vent pipe. Start by setting the vent cap in place to see where you’ll need to use sealant for bonding.
When you place the vent cap, don’t be concerned if the screw holes from the old vent cap don’t line up. You can drill new holes if needed and cover the old holes that don’t line up with sealant. After you’ve noted where you’ll need to use sealant, you can remove the vent cap and use the caulk gun to put a first layer of sealant around the pipe in a circle. Place the sealant right where the new RV plumbing vent cap will lay and be generous! You’d rather have too much sealant than too little.
While placing the sealant, you’ll also want to make sure that it covers any existing screw holes. Once all the sealant is in place, while it’s still wet, place the new RV plumbing vent cap down, wiggle in place and apply firm, steady pressure for a few minutes to ensure it bonds to the sealant.
Next, you’ll want to finish by placing the screws, which ensure the cap is well secured to your RV roof. If the holes from the previous cap didn’t line up perfectly, you’ll need to drill new holes. Once the holes are drilled and screws are placed, you’ll want to add another layer of sealant over each of the screw head and one final layer over everything to add one final protection against leaks.
When using the sealant, try your best to make it a thin, even layer, but don’t stress too much if it’s not perfect. As the sealant dries, gravity helps to thin it out and make it even. For the final step, screw on the upper portion of the RV plumbing vent cap and that’s it! You’re done and your RV is protected against bathroom odors making their way into your living space.
Replacing an RV Bathroom Vent Cap
When it comes to replacing an RV bathroom vent cap, you don’t have much choice in the type of cover you use, unless you wish to replace the entire vent. Instead, you’ll want to focus on finding a cap with the correct dimensions in order to ensure a good fit. Additionally, you’ll need to make sure the hinges on the new cover match up with your vent unit.
Replacing your vent cover is not exactly difficult, and only requires that you use a screwdriver or drill. That said, it is a bit too complicated to effectively describe the process in text. Therefore, we recommend watching this video to get an idea of exactly what you need to do.
This post contains affiliate links. RVshare may receive compensation if you make a purchase after clicking on a product link.
